Database Search
Database Search
Overview
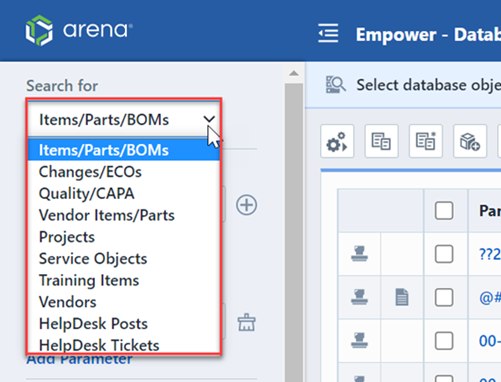
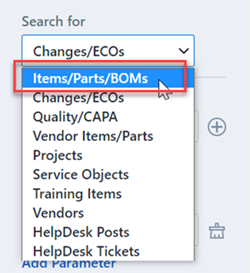
The Database Search form allows full parametric searching for the following objects:
- Items
- Changes/ECOs
- Quality/CAPA
- Vendor Items
- Projects
- Service Objects
- Training Items
- Vendors
- HelpDesk Posts
- HelpDesk Tickets
Launching
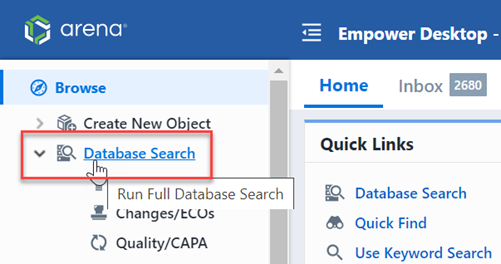
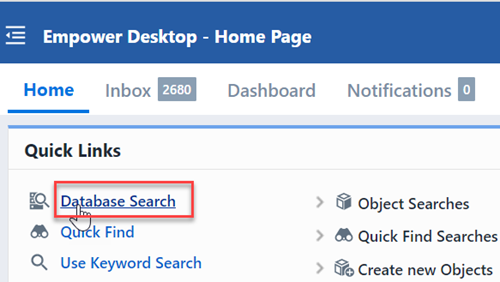
The search form can be invoked from the Home Page Navigator.
Search Form
The Database Search form contains the following sections:
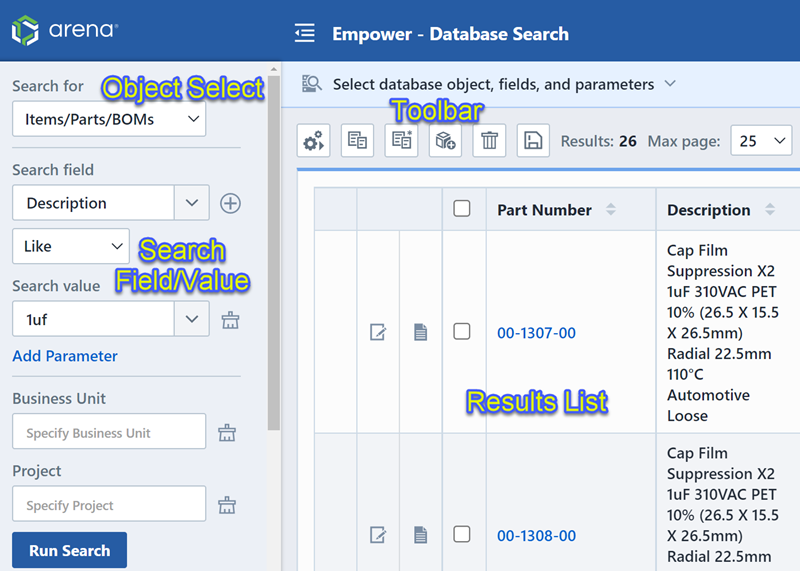
| Section | Description |
|---|---|
| Object Select | Select the object you wish to find |
| Search Field/Value | Specify the search field and value |
| Search Parameters | Area used to define all search parameters |
| Options | Search options |
| Search Fields | Select the fields to search |
| Toolbar | Actions to perform on Results List objects |
| Results List | Search results |
Object Select
You can select the object to search on by selecting the object drop list.
Search Parameters
To run a search, you must provide search parameters. You can specify an unlimited number of search parameters. To perform a search, you must first select the object type from the Search for: drop list.
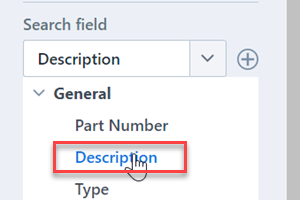
Once the Object is selected, you can then specify a search field by typing in the Search field area. Clicking the Search field area will display a list of available fields.
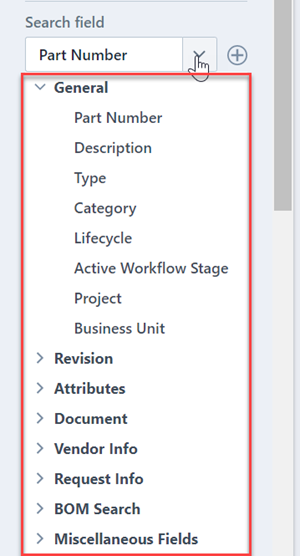
From the fields list, you can select the desired field.
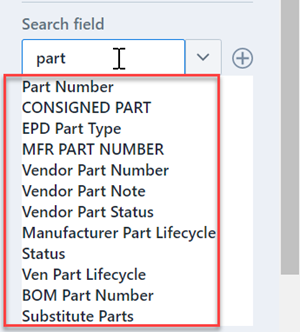
You can also type the name in the Search field area. This will filter the fields list.
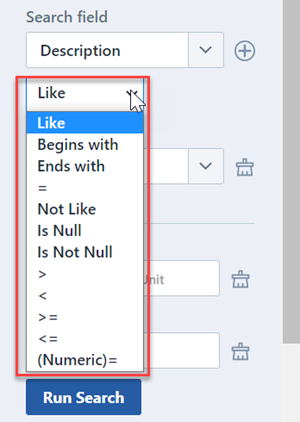
To set a field operator, select the desired operator from the Operator drop list.
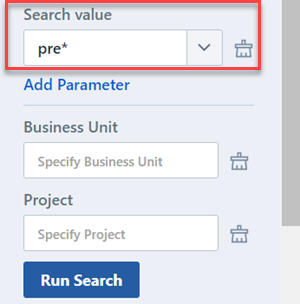
To specify a search field value, you can type in the Search value: field.
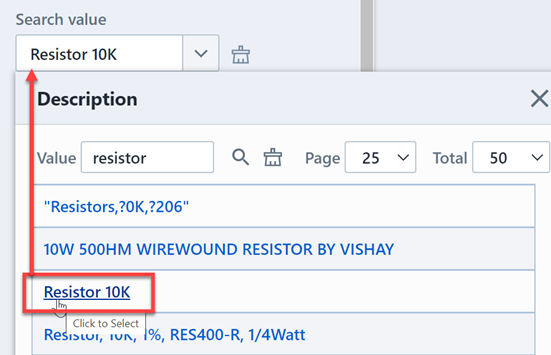
You can also use the arrow button to select an available field value.
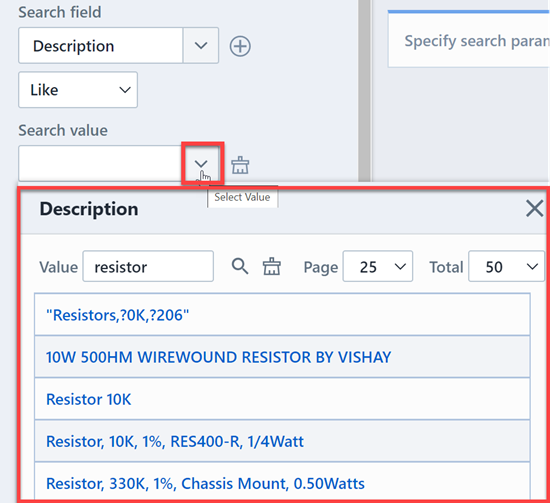
From the Select Value dialog box, you will be able to view existing assigned values. Clicking the value will assign it to the Search value field.
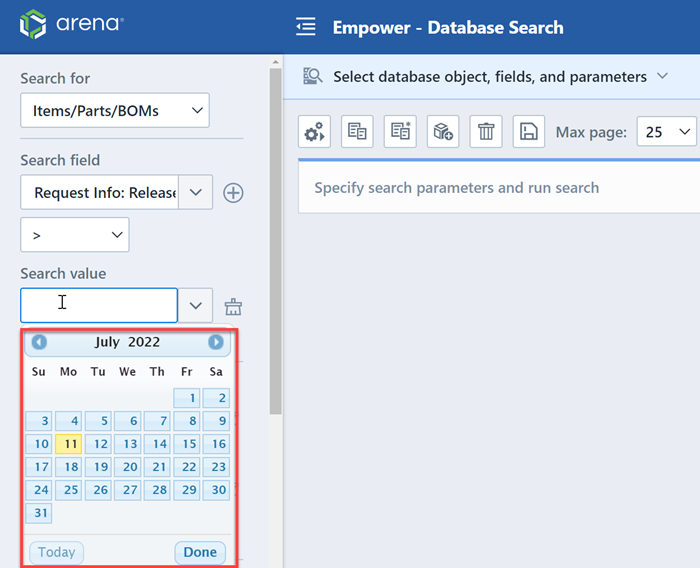
When performing a database search for objects using a date based search field such as Release On, a new calendar widget appears.
To ensure the calendar widget launched, click directly on the white area within the search field box.
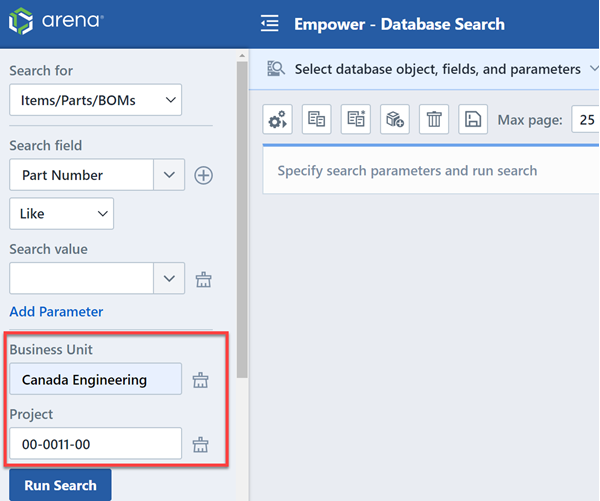
Business Unit and Project
Within the Settings, General Options section of User Preferences, users can set a default Business Unit or Project when performing a search, creating objects or running a report.
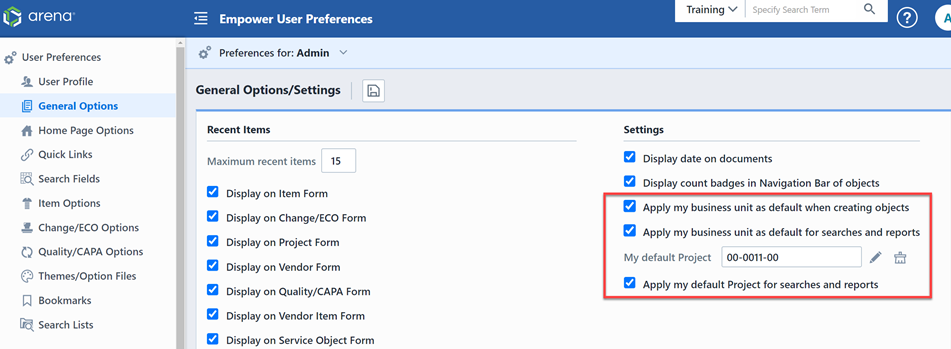
With the Apply my business unit as default for searches and reports preference is enabled, the assigned Business Unit for the user will be the default Business Unit in searches, inboxes, and reports.
When a default Project is set and the Apply my business unit as default for searches and reports preferences is enabled, the user's default Project will appear as the default project within searches, inboxes, and reports.
Executing a Search
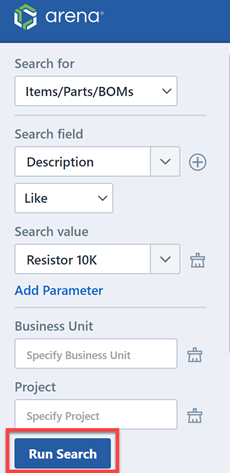
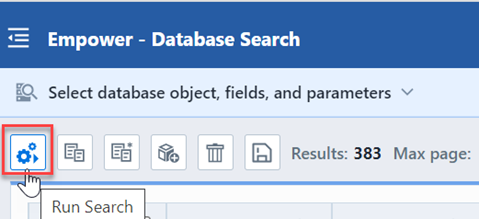
To run a search, click the Run Search button from the Search Parameters Pane.
Note: if multiple parameters are specified, the Run Search button will appear in the Parameters section.
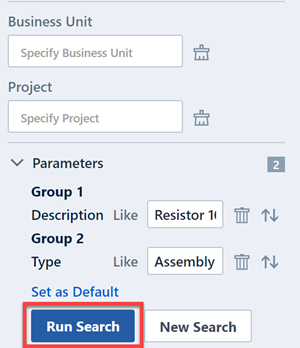
Refer to the Multiple Search Parameters section for more information on multiple search parameters.
You can also run a search using the Run button from the Search Toolbar.
Multiple Parameters
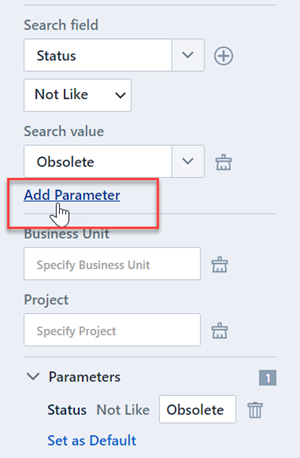
To specify multiple search parameters, you must first specify the search field, operator, and search value (as described above) and then click the Add button.
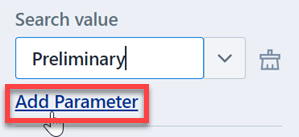
The search parameter will be added to the Parameters list.
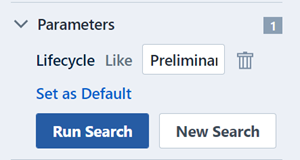
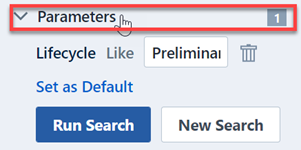
You can show or hide this list using the Parameters header box.
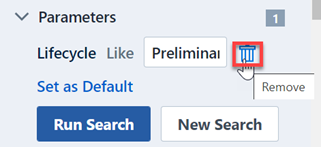
You can remove parameters from this list using the Remove button.
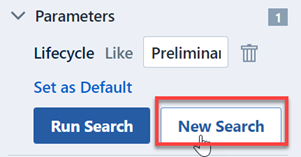
You can remove all parameters by clicking the New button.
Parameter Groups
The Search Form allows the user to customize the order/grouping of search parameters. By default, when a search parameter is added, the search form will determine if the parameter is already included and automatically group the parameters together as an "Or" condition. For example, a search already contains a search for "Status Like Preliminary".
When the user adds another parameter that includes the Status field ("Status Like Pending Release"), the system automatically "groups" the 2 Status fields together as an "Or" condition.
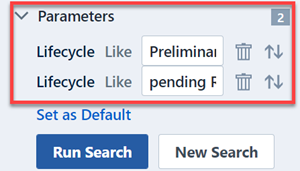
This results in a search for items with a status of "Preliminary" or "Pending Release". Different row colors are used to graphically display grouped parameters. Adding parameters that include fields that are not in the parameters list will automatically result in creating a new group ("and" condition)
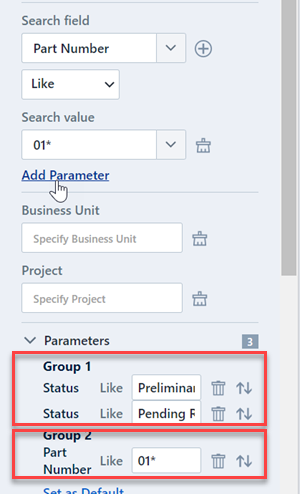
In this example the search would result in items that have a status of "Preliminary" or "Pending Release", and contain "01" in the Part Number field.
You can split items into separate/new groups using the Move button.
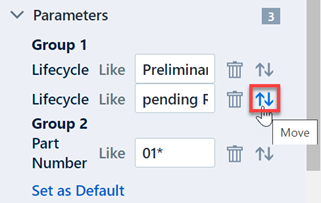
This will invoke the Move Group panel.

From the Move to drop list, you can select an existing group or create a new group.

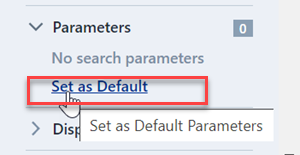
Dedault Parameters
You can define default search parameters that the search form will automatically include when the user selects a search object. To define default search fields, first add the desired search parameters using the methods described above.
To set default search parameters, click the Set As Default hyperlink.
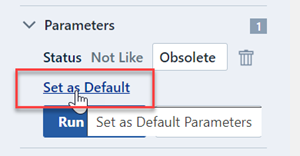
If you set default parameters, the next time the object is selected the default parameters will automatically be added to the parameters list.
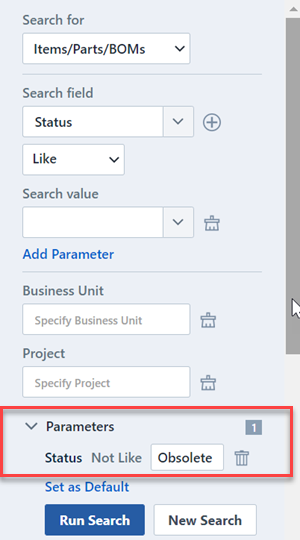
To clear/remove default search parameters, remove all fields from the Parameters list. Then, click the Set As Default hyperlink to clear any default fields.
Search Fields
Users can customize which fields they will see from any of the search windows. To select your own search results fields, expand the Display Fields area.
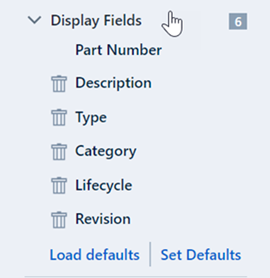
To set the default fields, click the Set Defaults link.
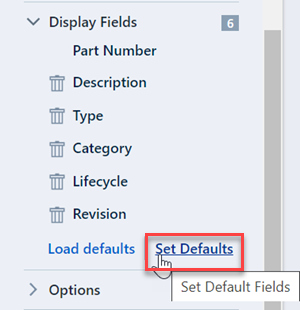
This will invoke the Search Fields section of the User Preferences form.
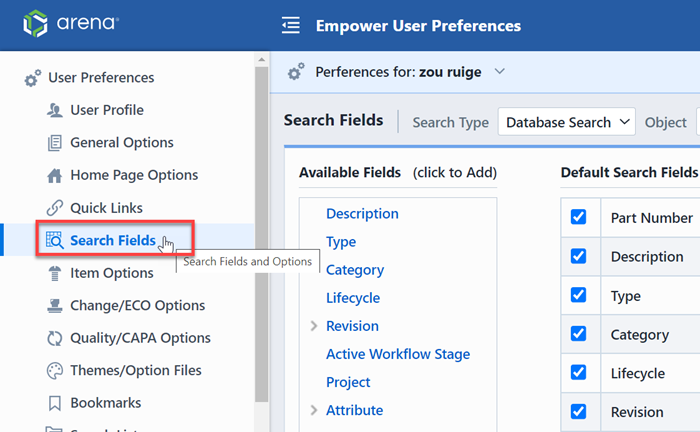
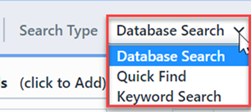
To set the default search fields, first select the Search Type (Database Search).
To set the desired output fields, select the object type.
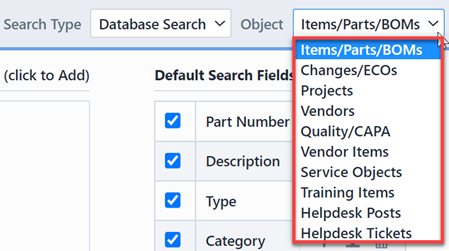
Once the object is selected, the Available Fields list will update to list all available fields for that object and the Default Fields list will display the user's current settings.
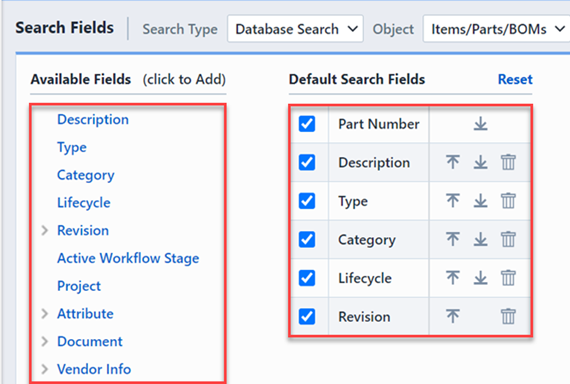
To add fields to the Default Fields list, click the field name hyperlink.
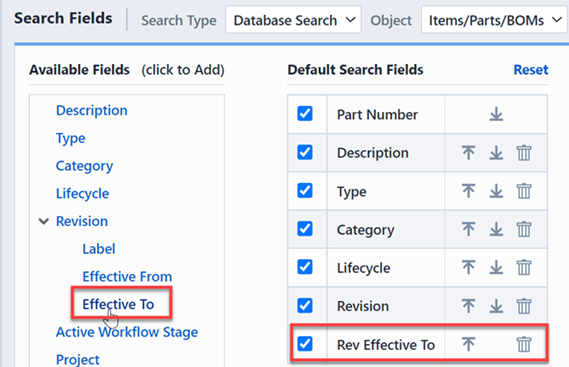
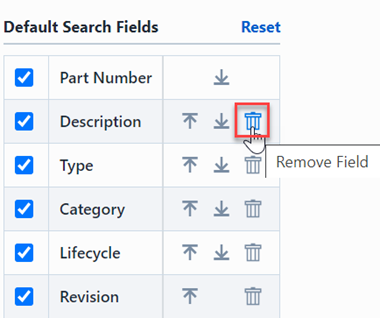
To remove a field from the search results list, hover over the field name to display the action buttons, and then click the Remove button.
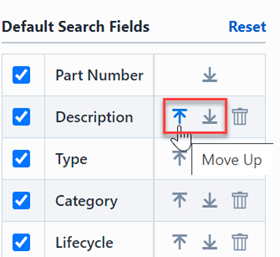
To change the order of a field in the search results list, hover over the field name to display the action buttons, and then click the Move Up and/or Move Down button.
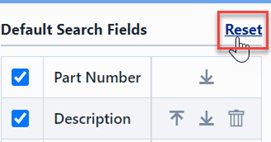
Clicking the Reset link will update the search results list to the default search fields.
Note: the number of output fields will have impact on the performance of the search.
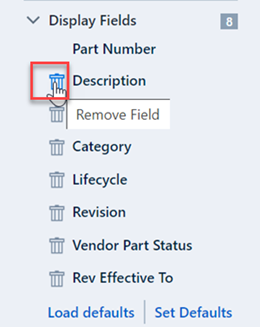
You can dynamically add and remove fields from the search results while you are on the Database Search form. The Display Fields section will list all fields included in the search results.
You can remove any of the view fields by clicking the remove icon.
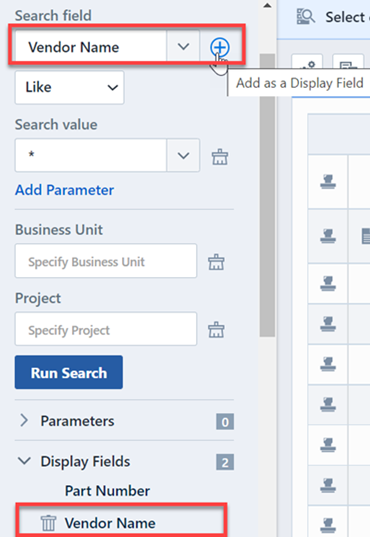
You can add additional fields to the search results by selecting the field in the Search Field list and then clicking the Add as Display Field icon.
Search Options
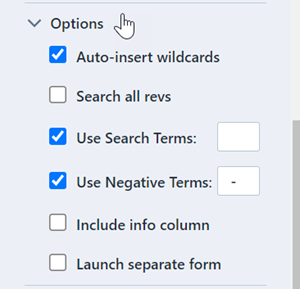
The Options pane provides the following options:
| Option | Description |
|---|---|
| Auto-insert wildcards | If this option is enabled/checked, the search form will automatically include wildcards in your defined search. E.g. typing: "flash" in the search fields would be interpreted as: "flash" |
| Search all revs | If this option is enabled/checked, the search form will include all item and training item revisions in the search results as opposed to just the active revisions |
| Use Search Terms | Allows you to specify multiple words as an "or" condition |
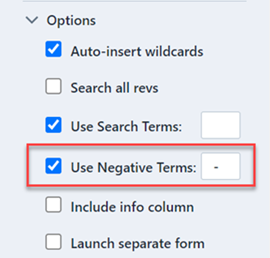
| Use Negative Terms | Allows you to specify "Not" conditions |
| Include info column | If this option is enabled/checked, the search results list will include an info column to display object image, BOM, document, pending, and under ECO status icons.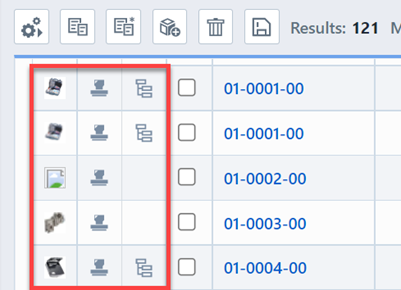 |
| Launch separate form | Launch the object in a separate browser tab/window |
Search Terms
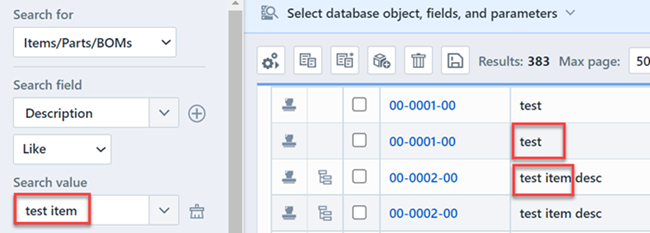
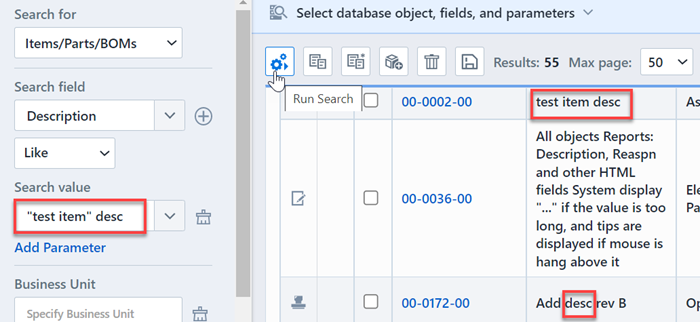
The search form allows users to use "Search Terms". Search terms are multiple words, delimited by a user-defined delimiting character, that will automatically result in creating an "or" condition for any field. For example, if you wanted to search in the description field for items containing "USB" or "Cable", you could simply check the Use Search Terms option (Options section),
And then run a search on test item in the description field.
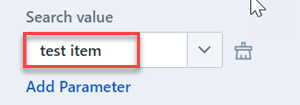
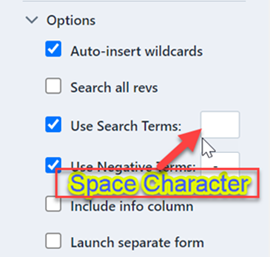
Note: the default delimiting character is a space character. This would result in any items containing test or item in the description field.
You can force the system to look for exact matches by enclosing the term with double quotes.
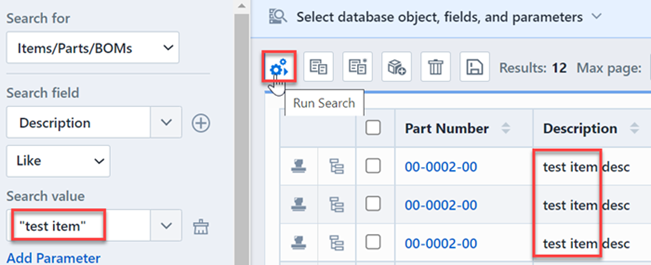
Exact terms can be combined with other search terms.
Use Negative Terms
When using Search Terms, you can also define "Negative terms". "Negative Terms" are automatically converted to "not" conditions. When using negative terms, you must define a prefix character that denotes the negative search terms in the Options section.
For example, if you wanted to search for all items that contained "test" in the description but not "item", you would search on "test -item" in the description field.
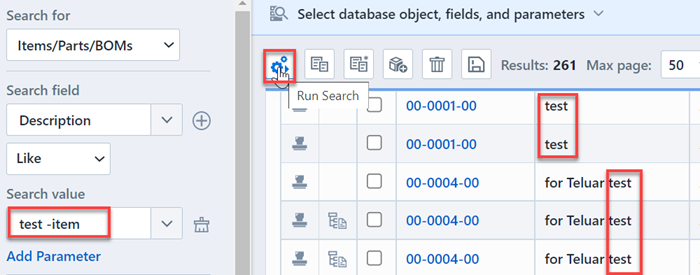
This would result in items that contained "test" in the description field but not "item".
Search Results
The Results List will display the items that match your search parameters and selected fields.
The Result list will include all fields in the Display Fields list. You can sort on any of the fields by clicking the column header.
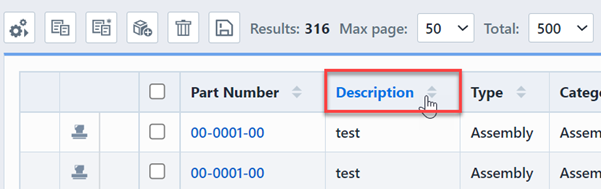
The Results list will contain "paging" options that can be controlled in the Toolbar. The toolbar contains 2 options that control the results view.

Clicking either hyperlink will display a drop list that will allow you to change the value/option.

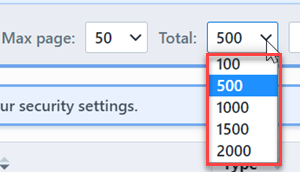
The Max Page setting will determine how many records are displayed "per page". The Total setting allows you to limit the total number or records to search in the database.
If the return records exceeds the Max Page count, the system will create paging buttons.

The paging buttons will allow you to move forward and back through the result pages.

The results list will contain hyperlinks that will allow you to launch/open the selected object.

You can filter the results by typing in the list search area.
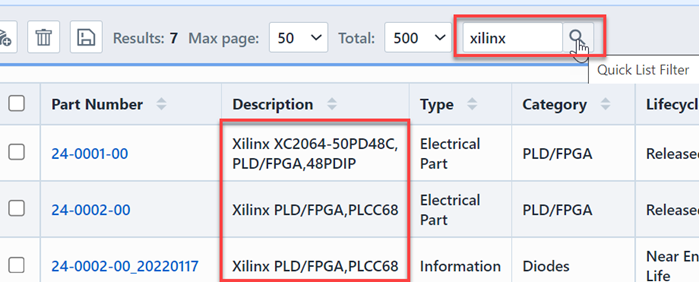
Note: this will only filter the rows displayed on the page and not perform a database search.
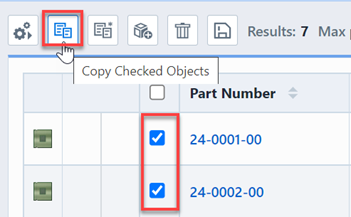
The results list will include a checkbox column for each record. This checkbox will be used by some of the toolbar commands.
Toolbar
The toolbar contains the following commands:
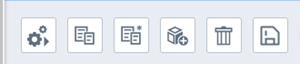
| Icon | Description |
|---|---|
 | Run the search |
 | Copy the checked objects |
 | Create a new object like the checked object |
 | Create a new object |
 | Delete checked objects |
 | Save/Export the search and results |
The Copy, New Like, and Delete commands will operate on the checked list items.
Copying Items
Once items are selected/checked in the Search Results list, you can copy the data to an Empower buffer using the Copy toolbar button.
Once items have been placed in the Empower buffer, you can paste the items to various other forms.
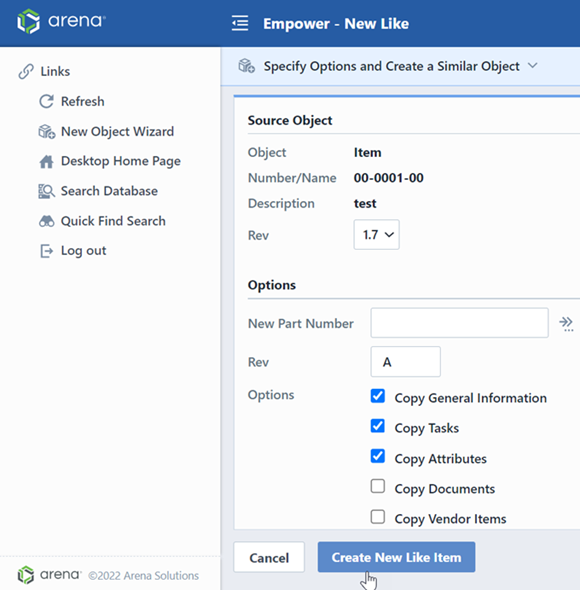
New Like
You can create a new item that is similar to an existing item. To create a similar item, check the item in the results list and then click the New Like toolbar button.
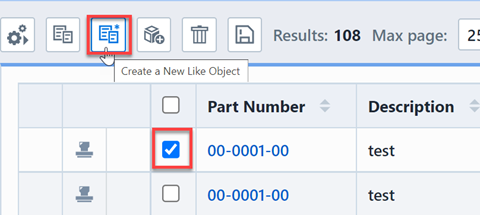
This will launch the New Like form.
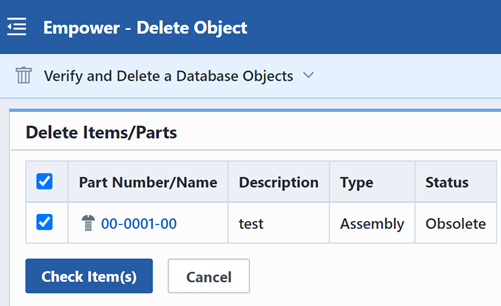
Deleting Objects
To delete database objects, check the objects in the results list and then click the Delete toolbar button.
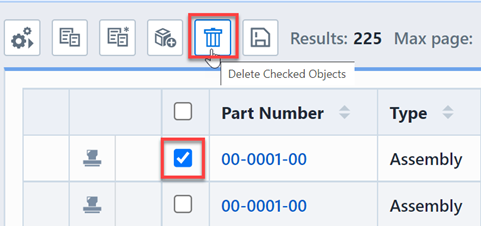
This will launch the Delete Object form.
Saving Searches
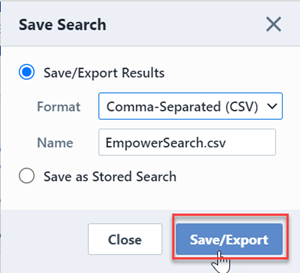
You can save the search parameters and/or results by clicking the Save toolbar button. This will launch the Save panel.
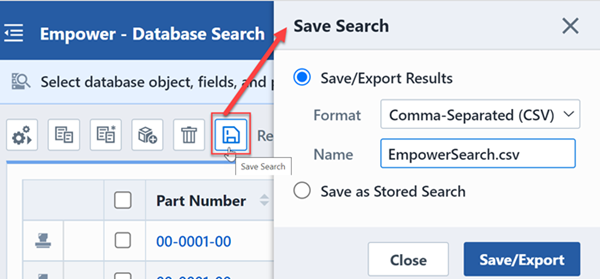
When saving, you can select either the Save/Export Results or Save as Stored Search option. To save/export the results, click the Save/Export Results option.
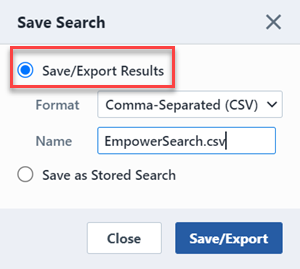
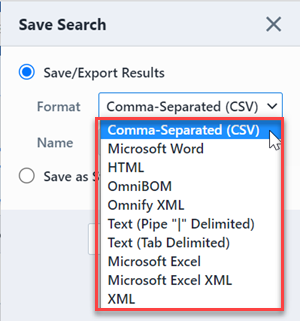
In the Export Results section you can select the report format from the available Formats list.
Once the format is selected, click the Save/Export button to create the report file.
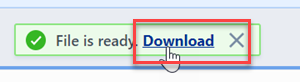
If the file is created successfully, the download link will appear in the toolbar.

You can download the file by clicking the Download link.
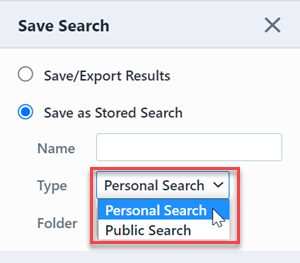
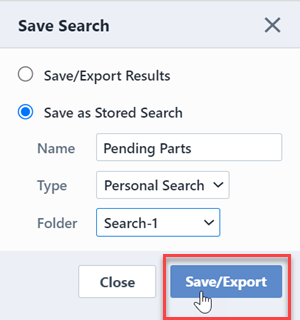
To save the search parameters, select the Save as Stored Search option in the Save panel.
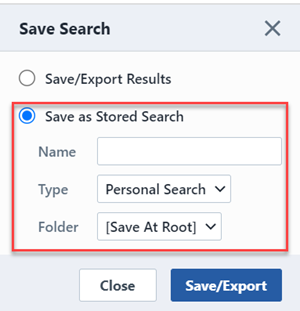
You will be able to specify the type as Personal or Public (if permissions allow).
If folders exist for the selected type, you will be able to place the search link at the root or within the selected folder.
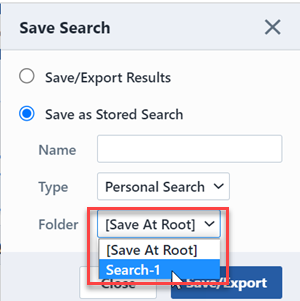
Once the type, location, and Name has been specified, click the Save button.
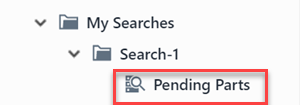
The Search link will now appear under the Common Searches and My Searches folders in the Navigator.
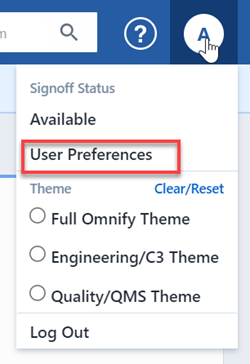
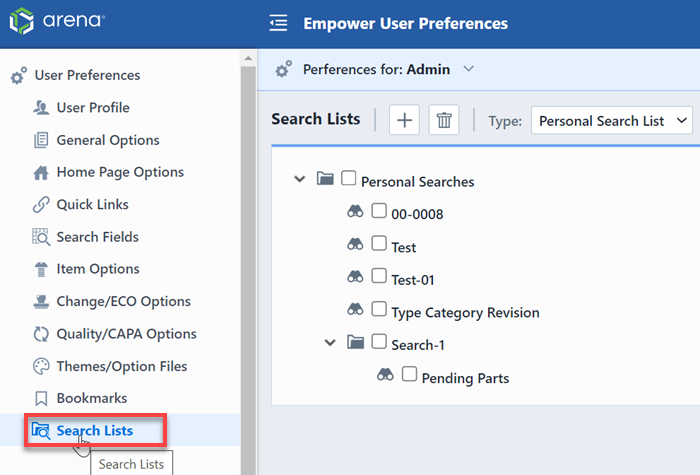
You can manage the folders and searches from the User Preferences form.
The Search Lists section allows you to manage both Personal and Common/Public (if permissions allow) folders and searches.
Saving searches will only save the search parameters and fields and not that data. When the search is invoked again, the system will search all current objects for matching data.