HelpDesk Tickets
HelpDesk Tickets
Overview
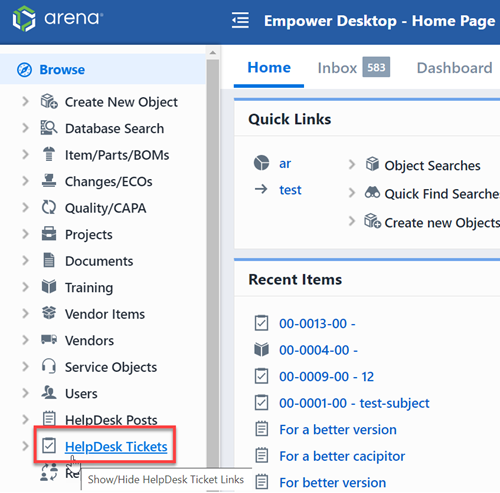
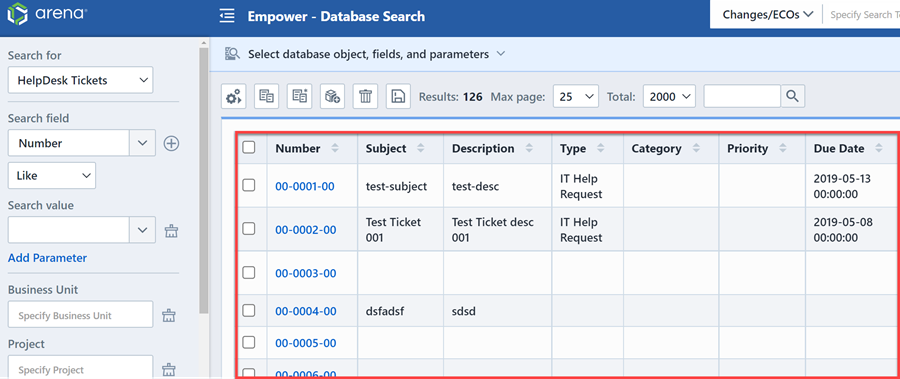
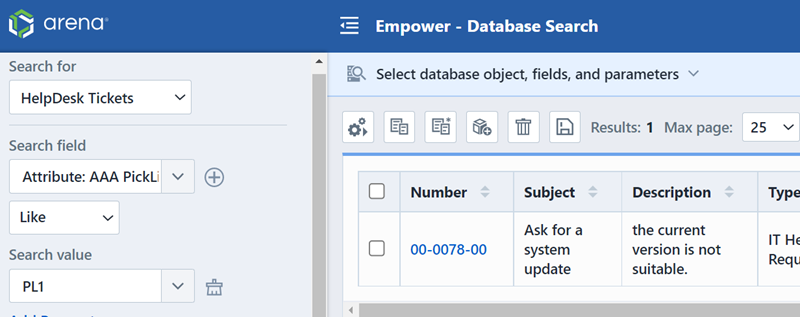
To browse a HelpDesk Ticket, you can select HelpDesk Tickets option from Navigator bar in Home Page.
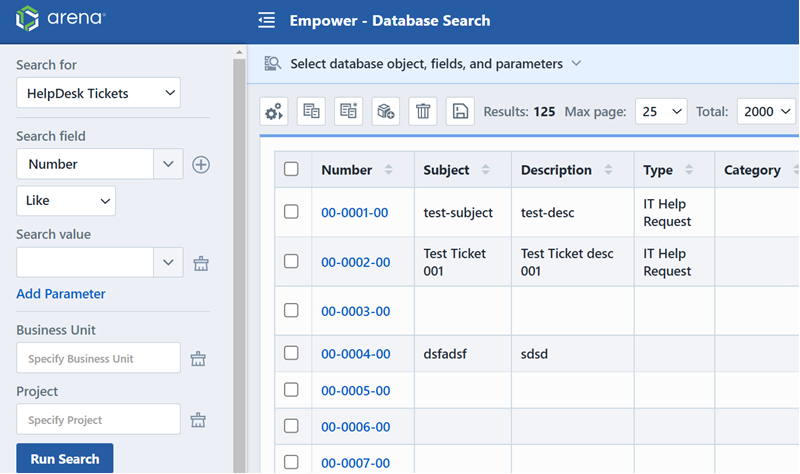
This will launch a search, you can search desired tickets to view details.
Within the Search Fields section of User Preferences, users can customize the search fields for HelpDesk Tickets across Database Search, Quick Find, and Keyword Search.
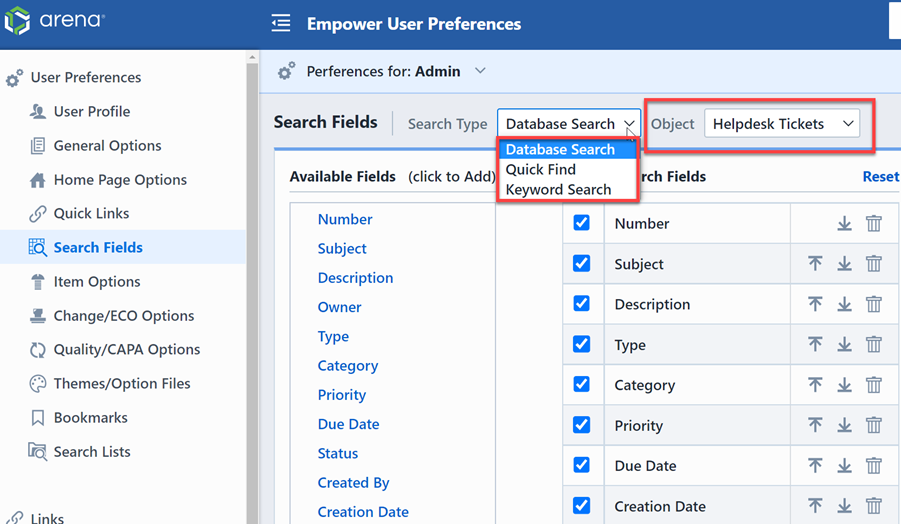
With the search fields customized in preferences, users will see their defined fields when performing a search for HelpDesk Tickets.
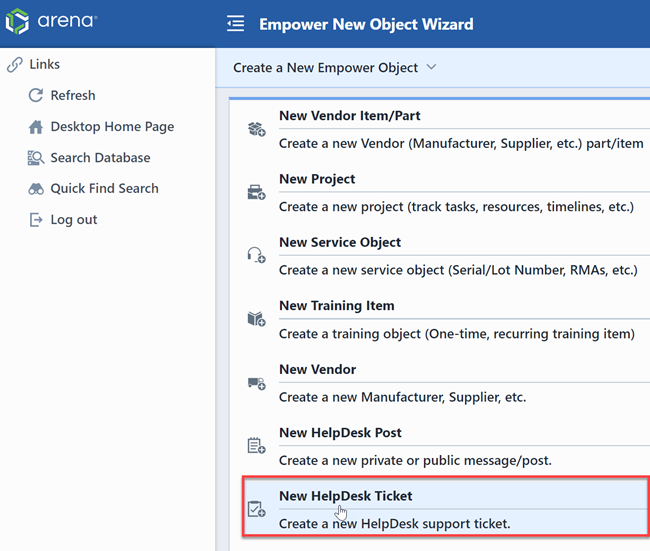
Create New HelpDesk Tickets
You can create a new HelpDesk Tickets in New Object Wizard.
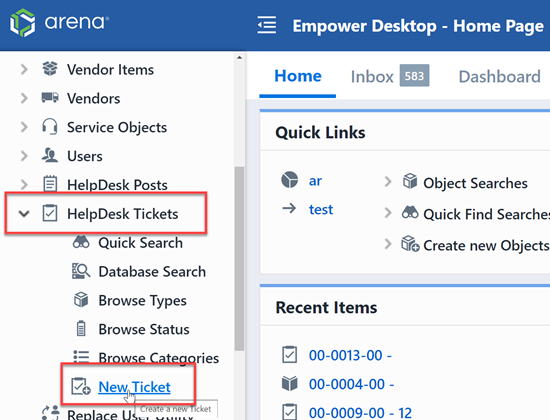
Also you can create a new ticket by selecting New Ticket option from Navigator bar in Home Page.
This will launch New HelpDesk Ticket page, fill in the information and click the Create Ticket button.
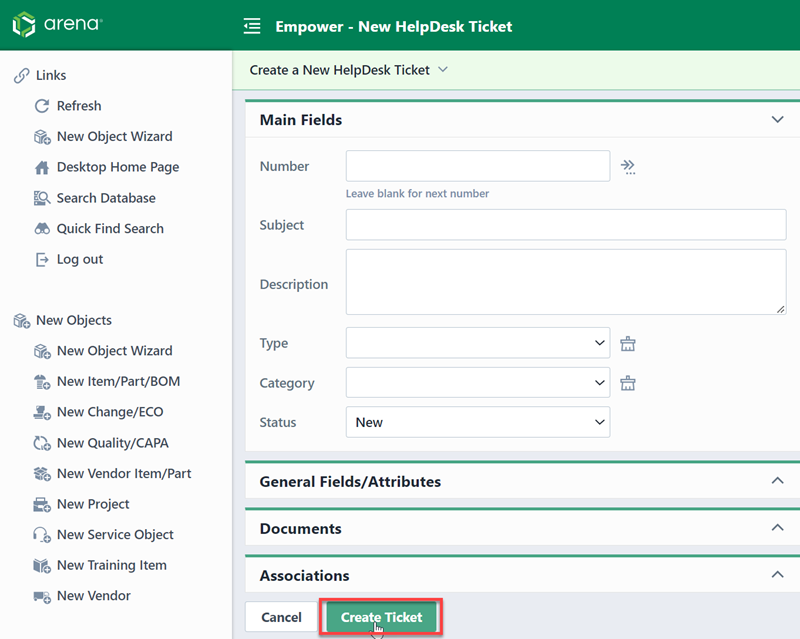
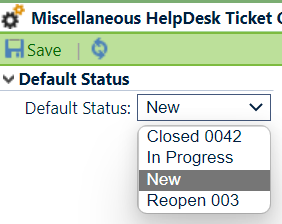
Default Status is defined in Empower Administrator - HelpDesk Ticket Options - Miscellaneous.
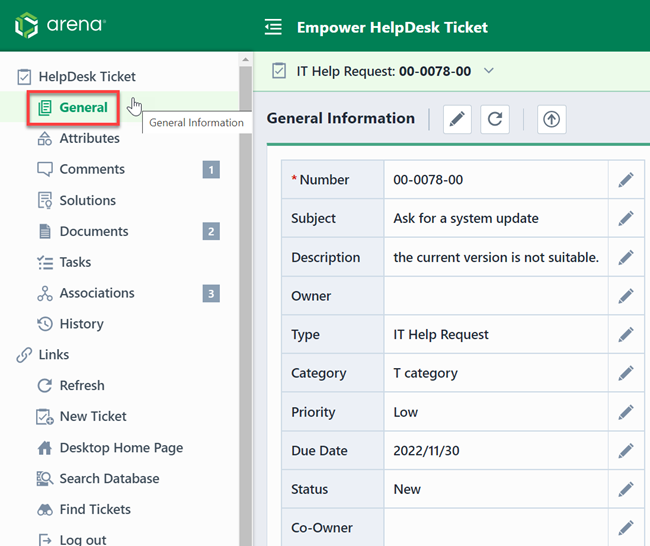
General
In General page, you can view the basic information about the current ticket, including Number, Subject, Description, Type and etc.
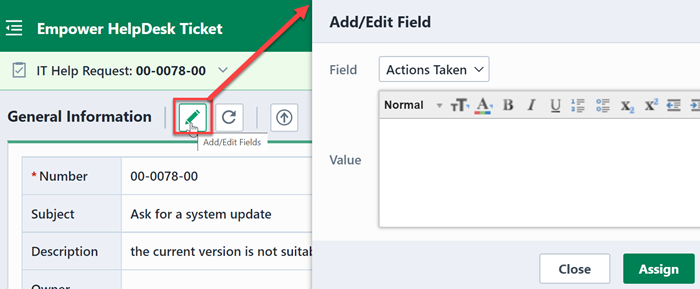
For several fields can be configured in Empower Administrator.
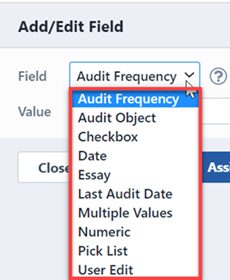
You can add or edit fields by clicking the Edit button, this will launch the Add/Edit Field panel.
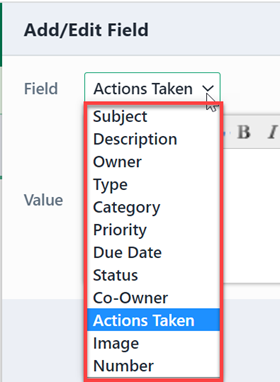
Select fields you wish to modify from the Field drop list.
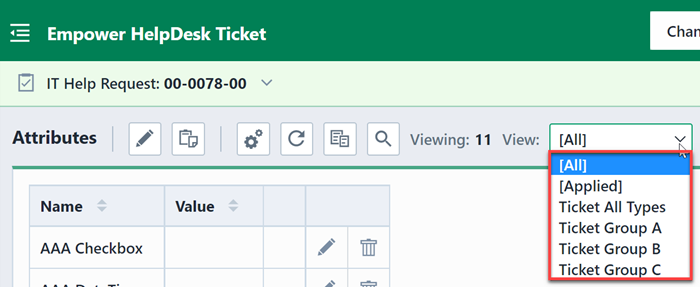
Attributes
Empower supports unlimited attributes/parameters for any database Helpdesk Tickets. Attributes have both an Attribute Name and Value. HelpDesk Tickets attributes can represent any associated data that you need to define for a ticket.
The HelpDesk Ticket Attributes Page contains the following sections:
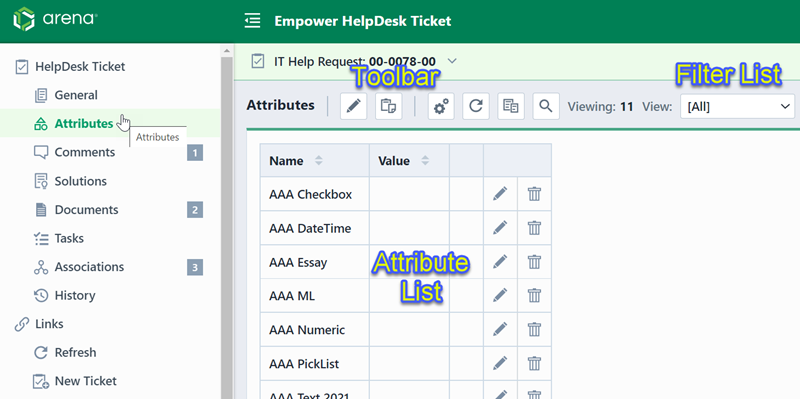
| Sctions | Description |
|---|---|
| Toolbar | Quick access to common attribute functions |
| Attribute List | Current attribute names and values (based on selected attribute group/filter) |
| Attribute Group Filter | Attribute groups list that allows you to display only certain attributes |
Attribute Fields
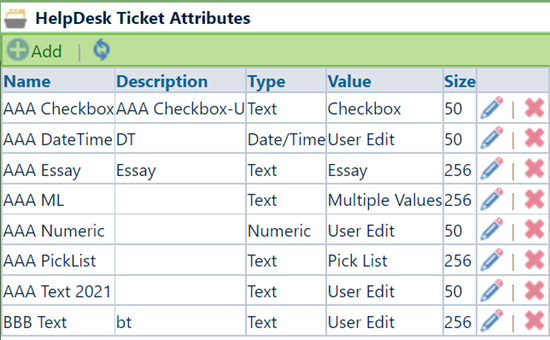
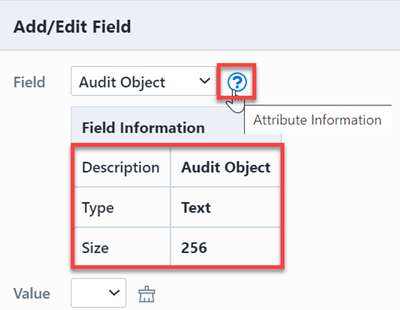
Attribute fields are defined in the Empower Administrator. Attribute fields can have the following type:
| Type | Description |
|---|---|
| Text | Any characters can be used in the value |
| Numeric | Values can only contain numeric values |
| Date/Time | Values can only be in Date/Time format |
Attribute Values types can be:
| Type | Description |
|---|---|
| User Edit | User can pick from an existing or type in a new value |
| Pick List | User can only select from a list of values defined in the Administrator |
| Multiple Value | User can select multiple values from a list defined in the Administrator |
| Essay | Displays a multi-line text box (full HTML editor when enabled) |
| Checkbox | User can select either checked (true) or unchecked (false) |
Maximum value lengths can be defined for each field.
Attribute Values
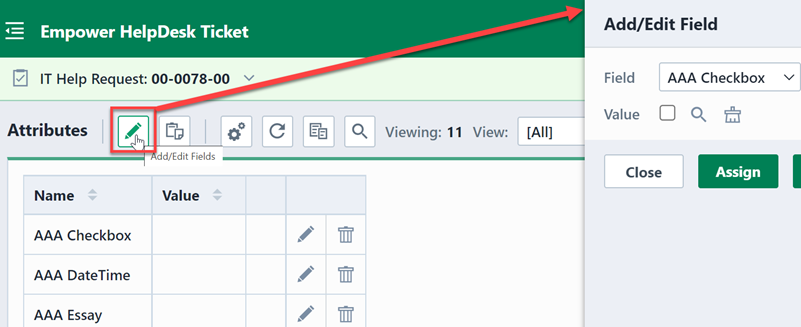
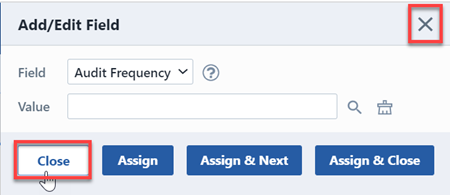
To modify the attributes, click the Add/Edit toolbar button. This will invoke the Add/Edit Field slide-out panel.
You can close the panel by closing the slide-out panel, or clicking the Close button.
To add/update any field value changes, select the field from the Attribute drop list.
You can view the attribute properties by clicking the Information icon.
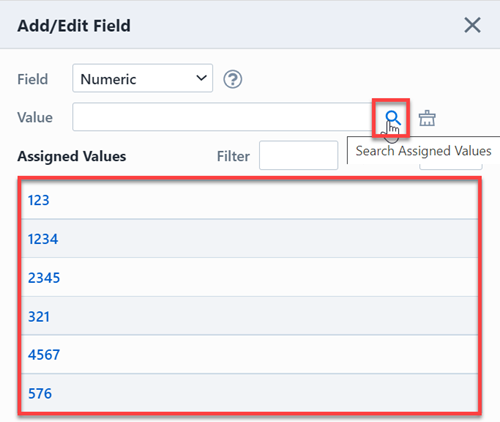
Depending on the value type, you will be able to select a value from a drop list (pick list), type a value (user edit), or select from a list (multiple values).


User edit fields will provide a search mechanism that will allow you to select from values from the database.
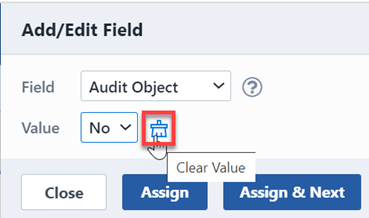
To clear/remove attribute values, click the Clear/Remove Value icon.
To assign/update the attribute value, click the Assign, Assign & Next or Assign & Close buttons.
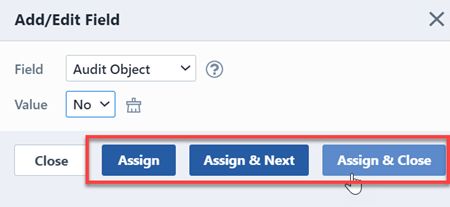
Clicking the Assign button will assign the attribute value and keep the slide-out panel open. Clicking the Assign & Next button will assign the attribute value and select the next field in the list. Clicking the Assign & Close button will assign the attribute value and close the slide-out panel.
Copy/Paste
You can copy the attributes from one vendor to another using the Copy and Paste commands on the toolbar or menus.
To copy attributes please click the Copy toolbar button. This will display the Copy Attributes panel.
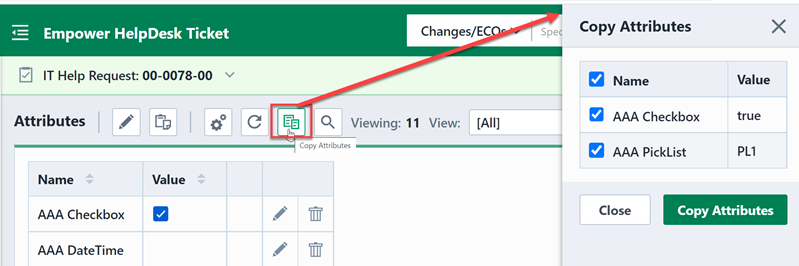
To select the fields to copy, click the field checkbox, and then click the Copy Attributes button.
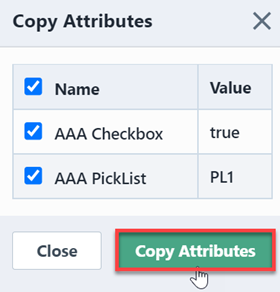
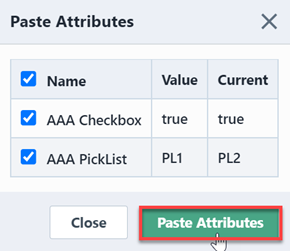
The attributes will be placed in the copy buffer. To paste those attributes to another ticket, open the ticket and then click the Paste toolbar button. This will open the Paste Attributes slide-out panel and display all fields in the copy buffer.
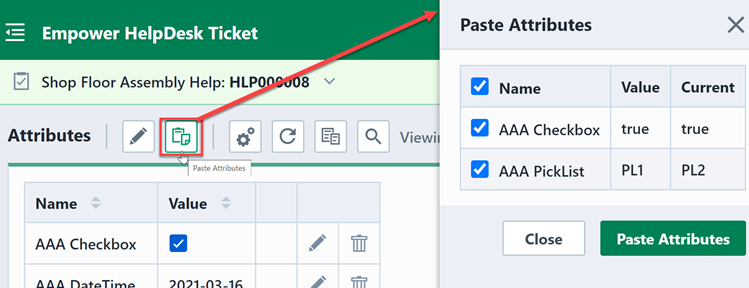
To assign the attribute values, check the desired fields and then click the Paste/Assign Attribute button.
Options/Filter
Attributes can be grouped into user-defined collections. These "collections" can then provide different attribute views on the Attributes page of the Item Master form in Desktop.
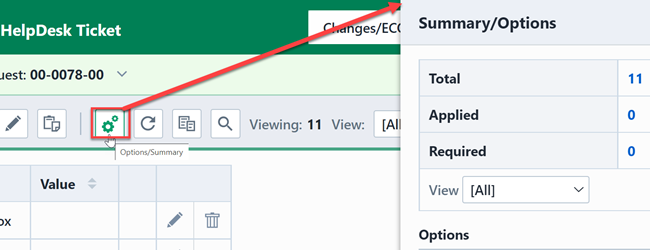
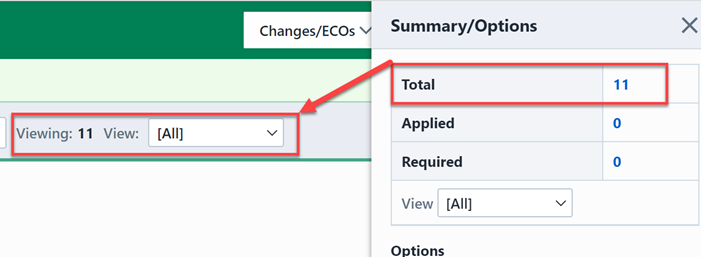
The Options pane of the Attributes page provides additional options and filtering links. To display the Options/Filter Pane, click the Options toolbar button.
The Filter list will provide hyperlinks that will allow you to automatically change the Attribute filter.
The Options section provides the following options:
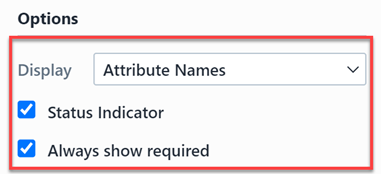
| Option | Description |
|---|---|
| Display | Select from the following options: Attribute Names, Attribute Descriptions, Names and Descriptions |
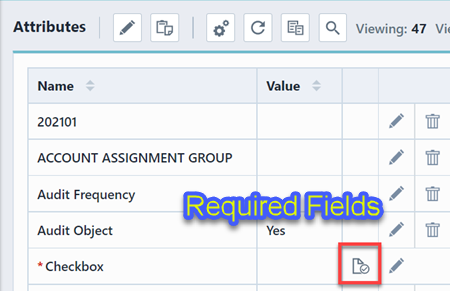
| Status Indicator | If this option is checked, the Attribute list will display a "status" column which the display an indicator for required and read-only fields |
| Always show required | If this option is checked, Required fields will also be displayed regardless of the selected filter |
The Status column will provide indicators on required fields.
Find Similar
The Find Similar function allows you to search for vendors with similar attributes. To run a Find Similar search, click the Find Similar toolbar button. This will display the Find Similar slide-out panel.
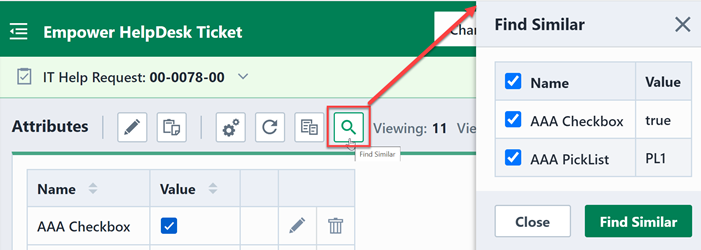
To search for similar fields, check the fields you wish to search on and then click the Find Similar button.
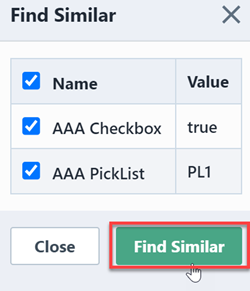
The Find Similar function will launch the Database Search window and search on the specified fields/values.
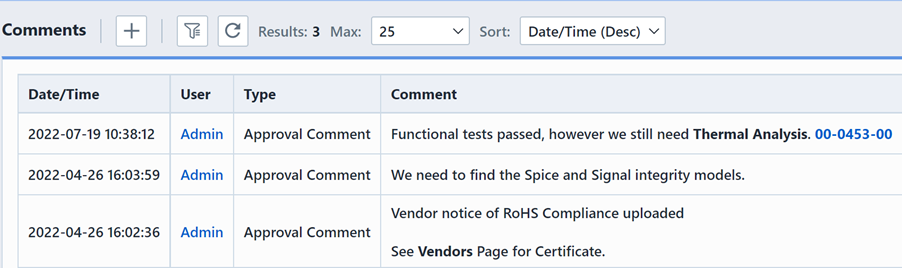
Comments
Comments can be assigned to all objects in the database. The Comments page contains all user comments and notes.
Adding
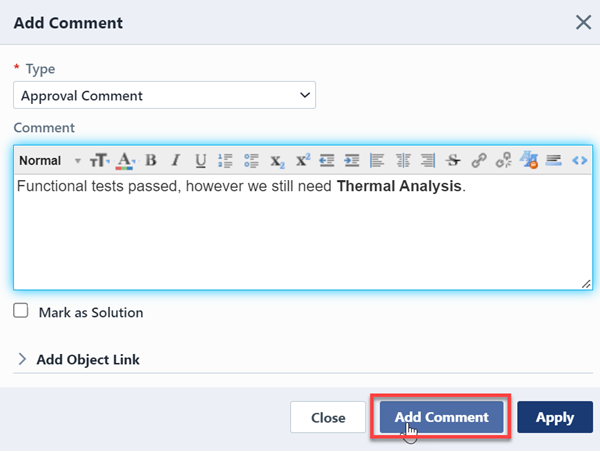
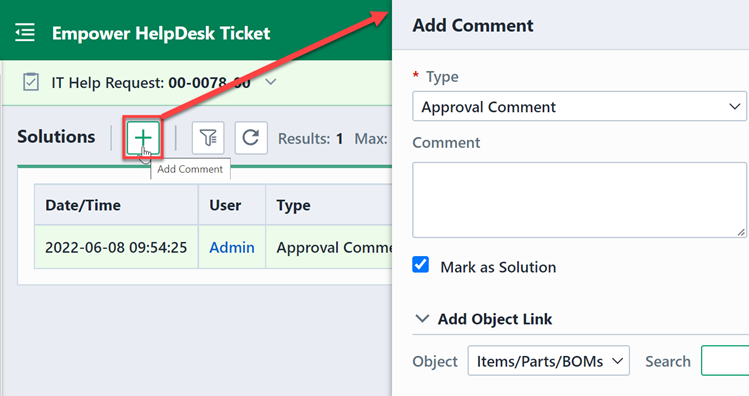
To add a comment, click the Add toolbar button. This will invoke the Add Comment slide-out panel.
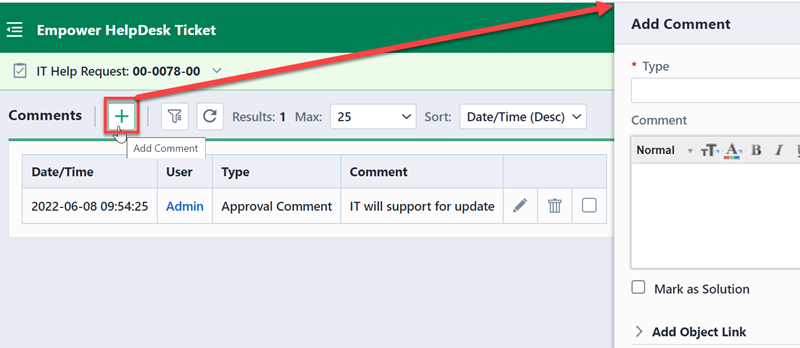
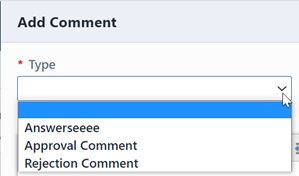
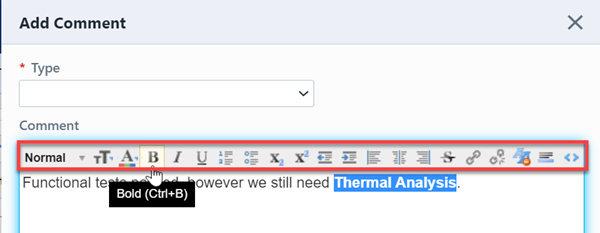
From the Add Comment slide-out panel you can select a comment type and define the comment text.
You can use the formatting toolbar to format the text as needed.
Click the Add Comment button to add the comment.
Editing
Your Empower administrator can enable rules to allow users to edit and remove their own comments. If the rules are enabled, an Edit link will be enabled in the Actions column.
Clicking the Edit link will display the Edit Comment dialog box.

To edit the comment, modify the text and/or type and click the Update Comment button.
Deleting
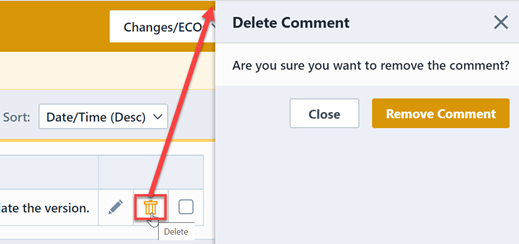
Your Empower administrator can enable rules to allow users to edit and remove their own comments. If the rules are enabled, a Delete link will be enabled in the Actions column.
Clicking the Delete link will ask you to verify the removal.
Associated Objects
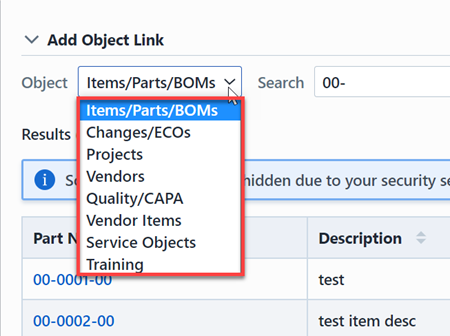
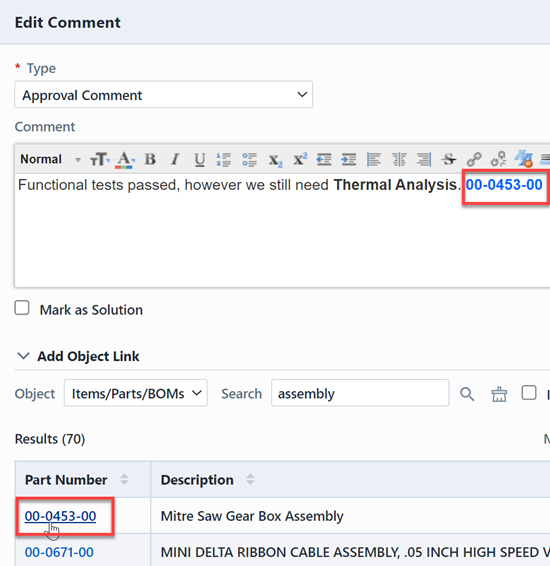
You can include links to Empower objects on any comment. To add an object link from the Add or Modify Comment dialog box, click the Add Object Link header to expand the search area.

You can select and search for any object in the database.

Click the object hyperlink to add a link to the comment.
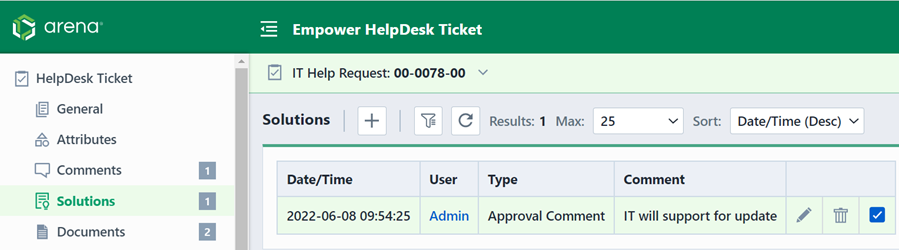
Solutions
You can mark any comments as solutions in Comments page.
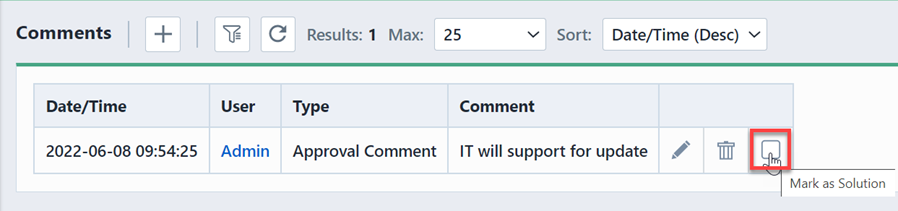
Once you check Mark as Solution option, the selected comments will show in the Solutions Page.
And you can add solutions by clicking the Add toolbar button.
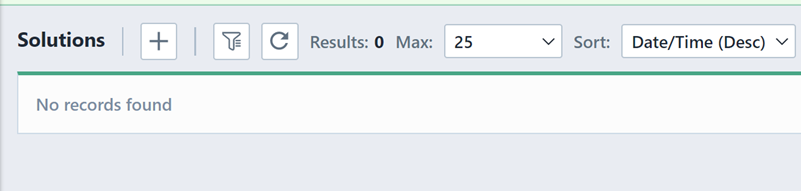
To cancel the solution, you can check out the Mark as Solution option.
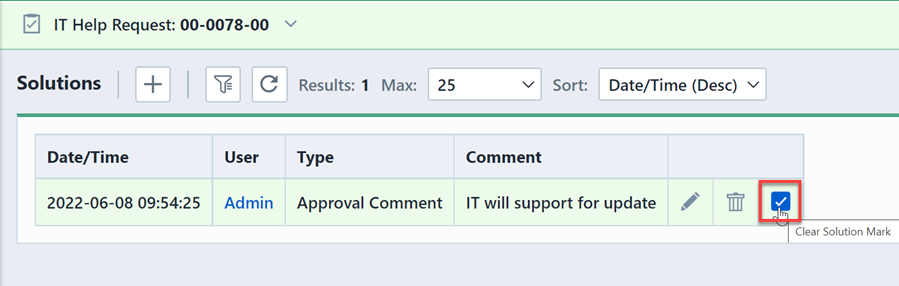
Then the canceled solution will disappear in the form.
Documents
Empower supports unlimited document/attachment assignments for any database object. Documents are specified by their path and file name, and can optionally contain a Title and Type to help describe the document.
Documents associated with any objects in the Empower database, can be either vaulted or non-vaulted documents.
| Types | Description |
|---|---|
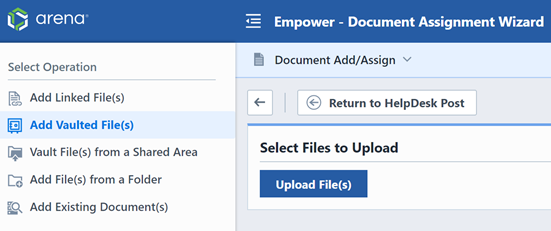
| Vaulted Documents | Document information is managed in and by the Empower database. Vaulted documents require "Check-out" and "Check-in" functions to make modifications to the document. |
| Non-vaulted Documents | Document items are links to existing files (typically in a shared file area/directory) |
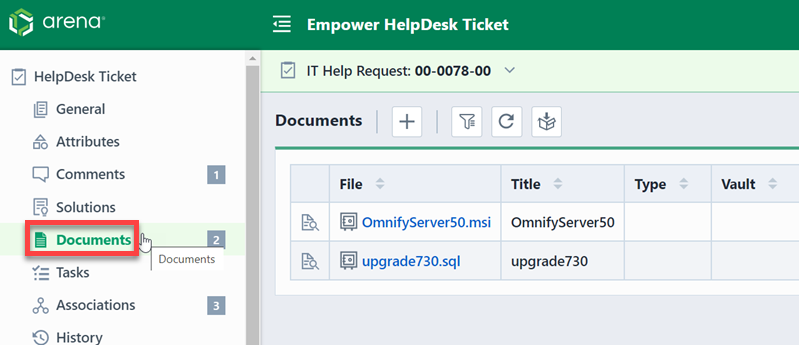
You can add documents by clicking the Add toolbar button, this will launch the Document Assignment Wizard.

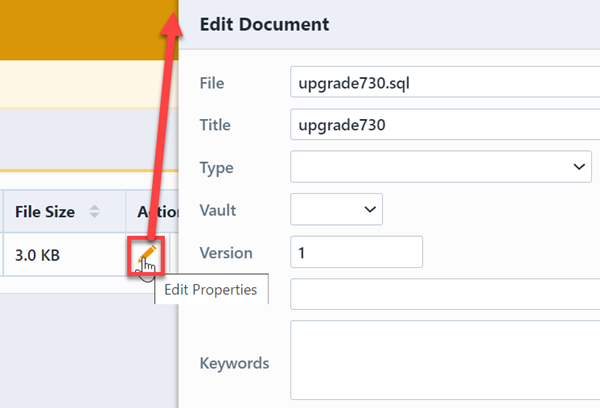
You can edit current documents by clicking the Edit button in Actions column, this will launch an Edit Document panel.
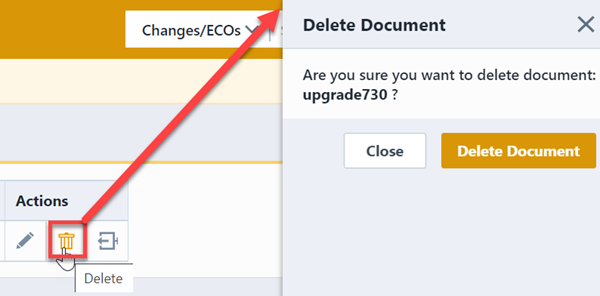
You can delete current documents by clicking the Remove button in Actions column, this will launch a Delete Document panel.
For more information, please refer to Document Management section for details.
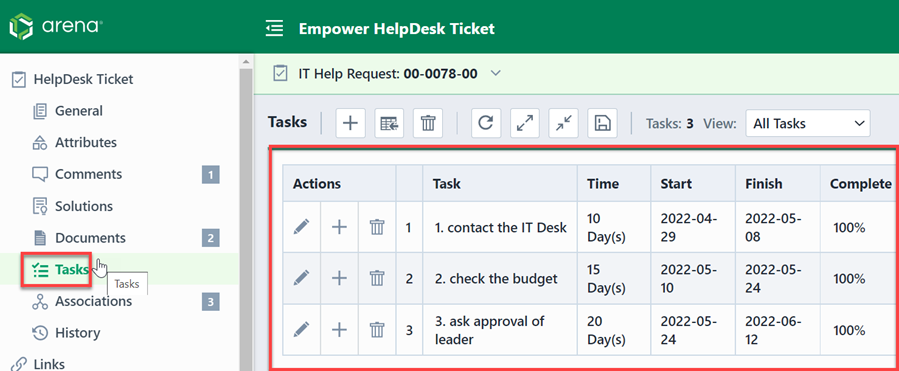
Tasks
Tasks are used to define actions that users are responsible for completing on any given object. Tasks can contain timeframes that define the start and end date and times allotted for a task's completion.
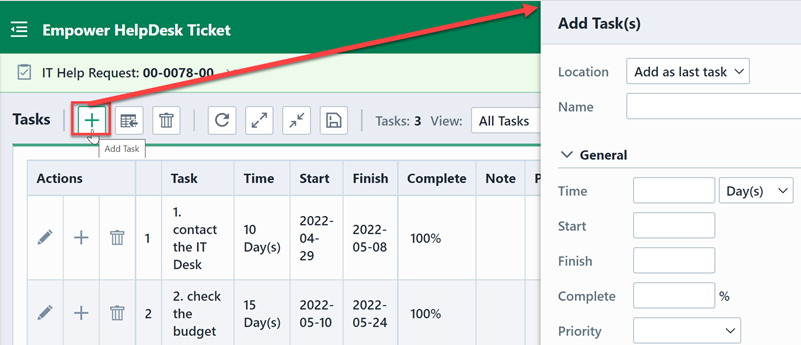
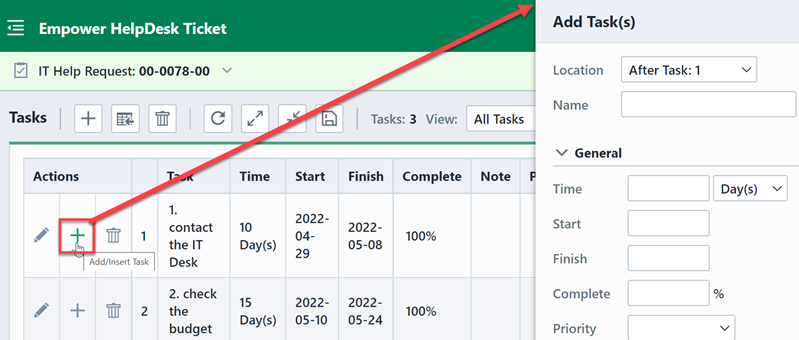
To add a task, click the Add button on the Tasks page. This will display the Add Tasks panel.
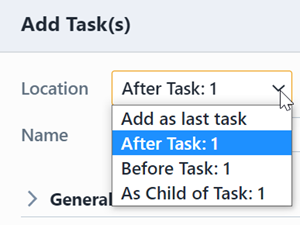
To insert a task, click Add/Insert button in Actions column, this will display the Add Tasks panel. And select desired task location from the Location drop list.
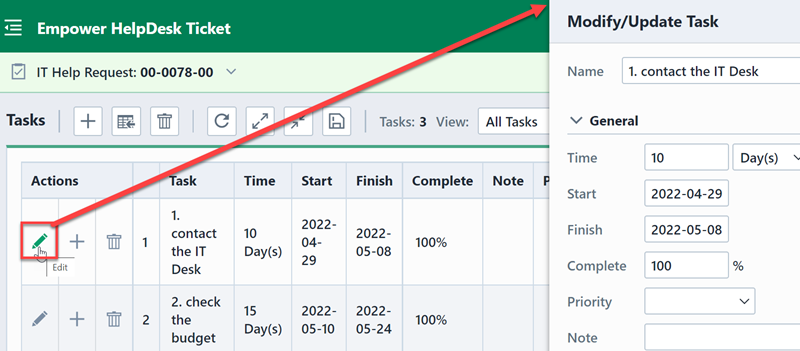
To modify the current tasks, you can click the Edit button in Actions column, this will display the Modify/Update Task panel.
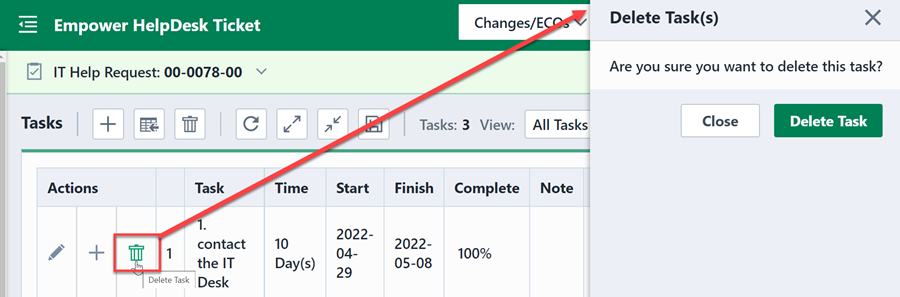
Also you can delete tasks by clicking the Remove button in Actions column, this will display the Delete Tasks panel.
For more information, please refer to Task Management section for concrete functions.
Associations
Object associations can be used to provide intuitive grouping and navigation of similar or related items. Associations can also be used for a variety of reporting and 3rd party interface purposes. You can assign associations to any object in the system.
The Associations page lists object associations as well as a list of all objects that the current object is associated to (Where Associated list). The Associations page contains the following sections:
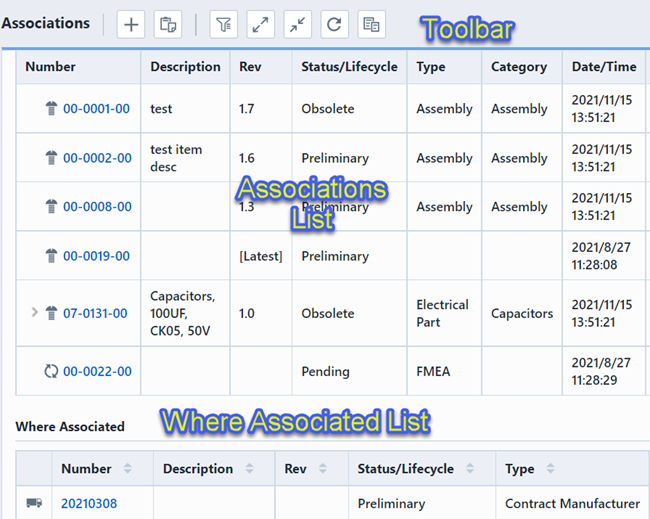
| Section | Description |
|---|---|
| Toolbar | Quick access to common functions |
| Associations List | Current listing of objects that have been assigned as association to the current/open object |
| Where Associated List | List of objects that have associated the current/open object |
The Associations Toolbar contains the following commands:
| Icon | Command |
|---|---|
 | Add an Association |
 | Paste Associations from the Buffer |
 | Show/Hide the Options Panel |
 | Expand all items |
 | Compress all items |
 | Refresh/Reload the list |
 | Copy the associations list to the buffer |
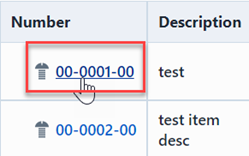
To open any object on the list, click the hyperlink on the number column.
Display Options
The Associations page provides various viewing options. To set/modify the options, select the Options toolbar button. This will invoke the Options slide-out panel.
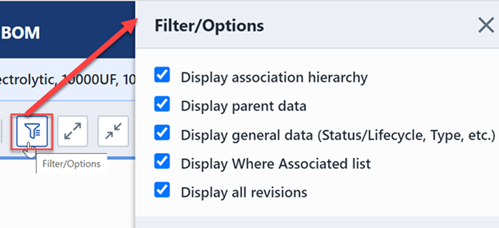
The Options pane provides the following options:
| Option | Description |
|---|---|
| Display association hierarchy | If checked, the Associations list will display all association hierarchy. If unchecked, the Associations list will display only the objects associated with the current/open object. |
| Display parent data | If checked, the Associations list will include the parent number and description of the associated object. |
| Display general data (Status, Type, etc.) | If checked, the Where Used page will include the status, type, revision, etc. of the associated objects. |
| Display Where Associated list | If checked, the system will display the "Where Associated" list (described above). |
| Display all revisions | If checked, the Associations list will display all revisions of the objects. If unchecked, the Associations list will display only the active revision of the objects. |
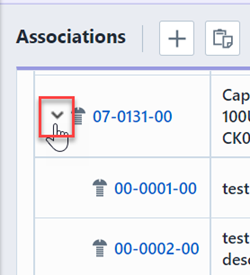
Hierarchy Display
The Associations list can display the complete relationship (hierarchy) of associated objects. Checking the Display association hierarchy in the Options panel will enable the hierarchical display.
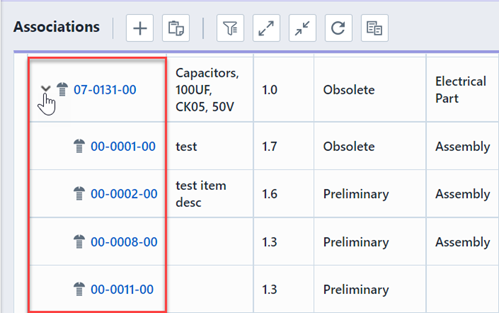
In the above example, the Quality/CAPA item: CAPA-00001 is associated with Change/ECO: ECO-00003 and ECO-00003 is associated with the open/current item: 01-0007-00.
You can navigate through the hierarchy by clicking the expand/compress buttons.
Adding
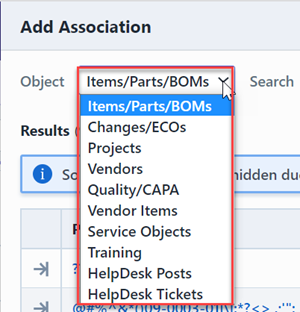
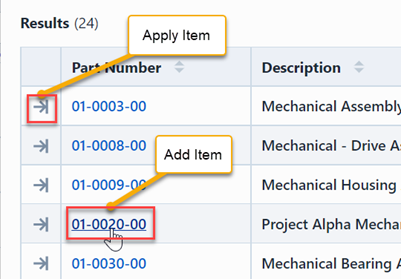
To add an associated item, click the Add toolbar button. This will invoke the Add Association dialog.
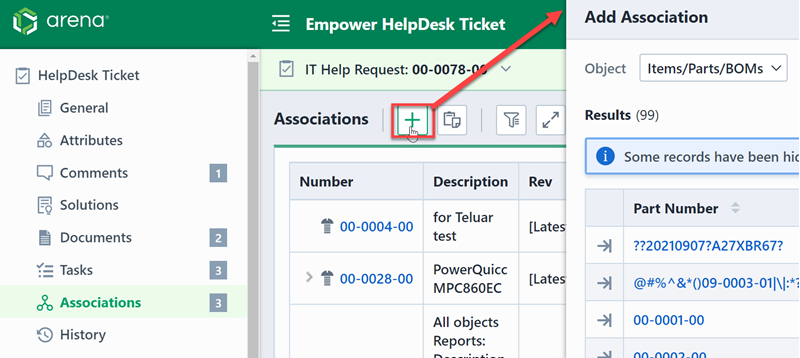
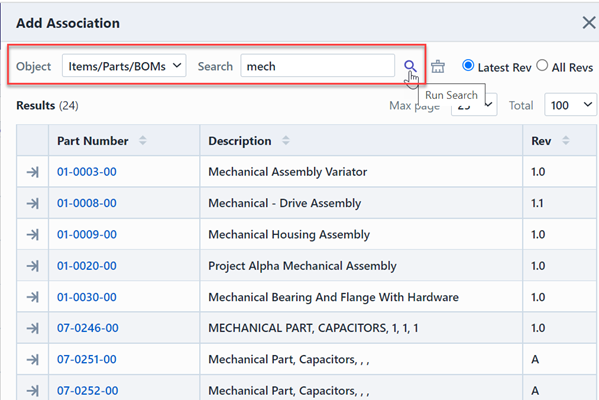
From this form you can select the desired object type.
You can then search the key fields to find the desired item.
You can add objects by clicking the Apply button (form will remain open) or by clicking the Number hyperlink (closes the panel).
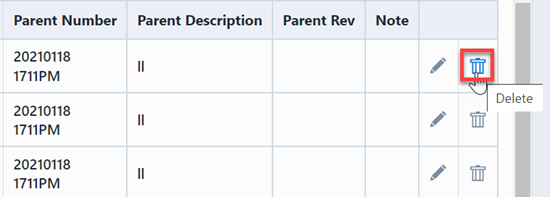
Removing
To remove an association, click the Remove button.
Copy/Paste
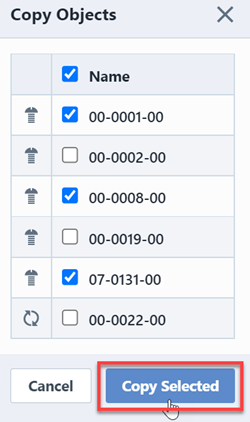
To copy the associated items to the buffer, click the Copy toolbar button. This will display the Copy Objects panel.
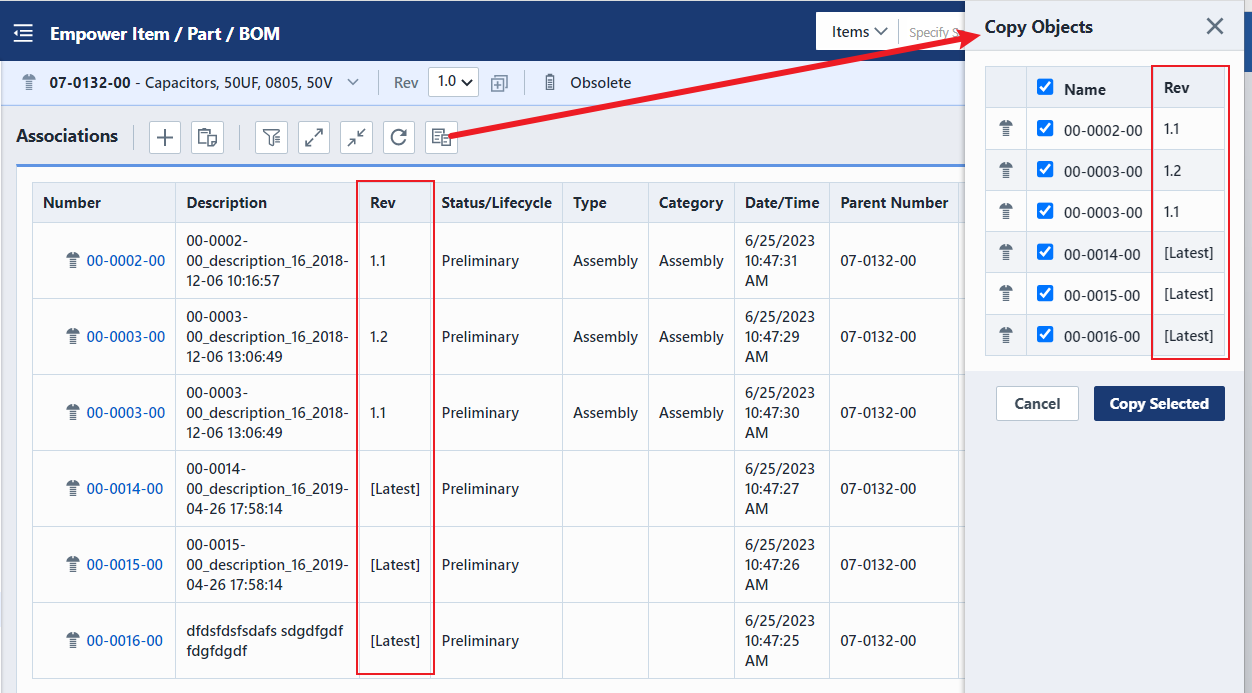
To copy objects to the buffer, check the desired items and then click the Copy Selected button.
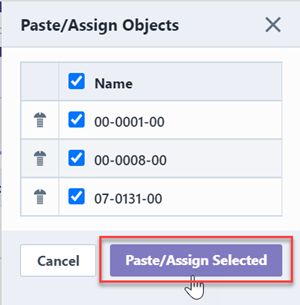
To paste objects from the buffer, click the Paste toolbar button. This will display the Paste/Assign Objects panel.
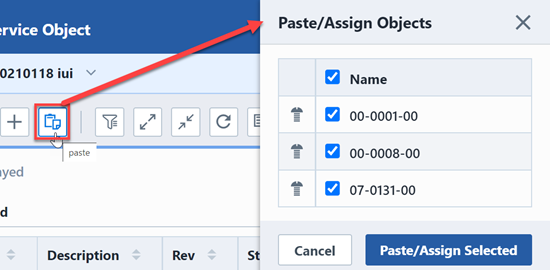
To assign the buffer items, check the desired items and then click the Paste/Assign Selected button.
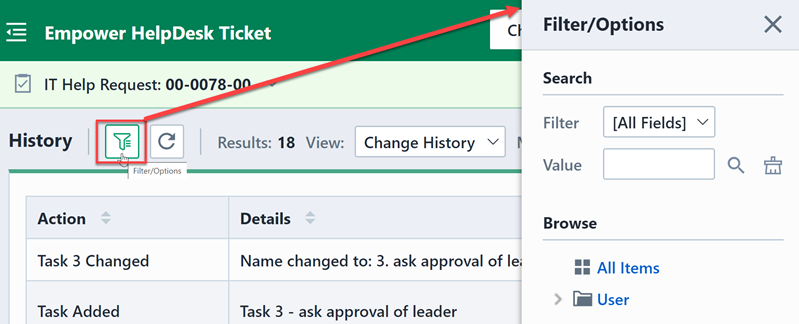
History
The History Page lists all change, viewing, and email history (audit trail) for every database object. Any change that occurs (interactive changes, data uploads, ECO changes, etc.) is recorded in the database. Desktop will automatically fill in the change and viewing history information for this page.
The History Page contains the following sections:
Viewing Modes
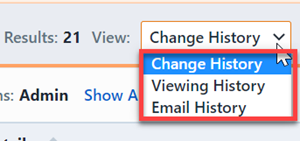
The History list will display all changes to the item as well as the viewing (who has opened the item) and email history. To change the view, select the Viewing History, Change History or Email History option from the Display drop list.
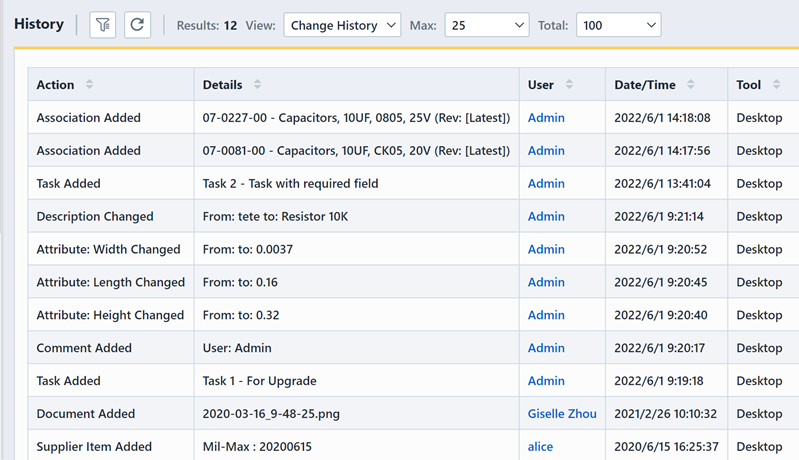
Change History
The Change History list contains the following information:
| Components | Description |
|---|---|
| Action | Type of Change (Attributes, BOM, Vendor Items, Documents, etc.) |
| Rev | The revision of the item to which the change was made |
| Details | Actual data changes |
| User | User who made the change (or released the ECO) |
| Date/Time | When the change was made |
| Tool Used | Empower module used to make the change (i.e. Desktop, ECO Processor, etc.) |
Viewing History
The Viewing History list contains the following information:
| Components | Description |
|---|---|
| User | User who opened the item |
| Date | When the item was viewed |
| Tool Used | Tool/module used to view the item |
| Workstation | Machine/system used to view the item |
Email History
The Email History list contains the following information:
| Components | Description |
|---|---|
| Send Date/Time | Date and time the email was sent |
| Subject | Subject line of the email |
| User | User who sent the email |
| Type | Either interactive or automatic |
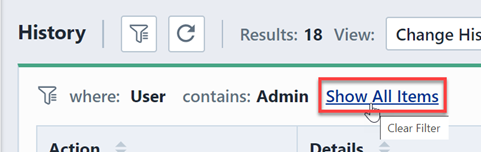
Search Filter
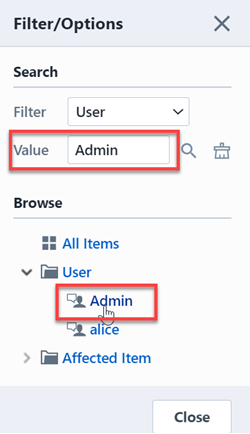
You can search for history events by clicking the Search/Filter toolbar button. This will display the Browse/Search slide-out panel.
You can use with the Browse tree to select a particular field, or select the field and field value to filter the list.
The list form will display any filters.
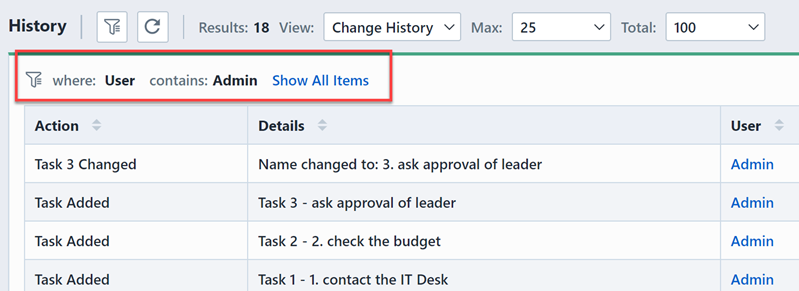
You can clear the filter by clicking the Show All Items button.