Affected Items (Changes/ECOs)
Affected Items (Changes/ECOs)
Overview
Affected items on a Change/ECO represent the items whose data will be changed by the changes defined on the Item Changes page.
Affected items list can contain:
- Items (Parts/BOMs/etc.)
- Vendor Items
There is no limit to the number of Affected Items you can have on a Change/ECO.
Affected Items Page
The Affected Items Page contains the following sections:
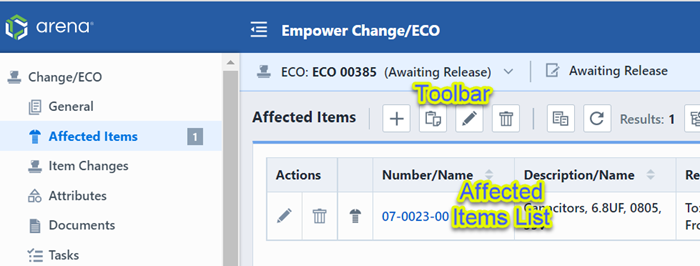
| Section | Description |
|---|---|
| Toolbar | Quick access to common Affected Items functions |
| Affected Items List | Current listing of Affected Items |
The Affected Items Toolbar contains the following commands:
| Icon | Command |
|---|---|
 | Add Affected items/Import affected items from a file (Excel, text, etc.) |
 | Paste session buffer items as affected items |
 | Edit properties (Status, Effective, Notes, Dispositions) of all/multiple items (Group Edit) |
 | Remove all/multiple items |
 | Copy items to the session buffer |
 | Display the Data Checks menu |
 | Display the Reports menu |
Data Checks Menu
This menu includes a number of features that can help you keep track of your Items, Boms, and Releases: 
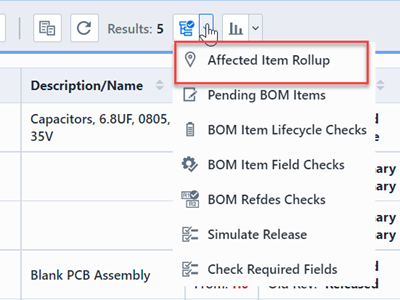
- Affected Item Rollup: Shows the Rollup Results. From here you can also add affected the item if not in list.
- Pending BOM Items: Shows if there are any pending BOMs including this Affected Item
- BOM Item Lifecycle Checks: Checks BOM Lifecycle and lifecycle weight for the selected Affected Item
- BOM Item Field Checks: Select specific fields to check in your Affected Item's BOM
- BOM Refdes Checks: check refdes for each Affected Item's BOM
- Simulate Release: Simulates the release of this Item to check for errors and complications, but will not release the change.
- Check Required Fields: Check required fields for affected item after changes.
Reports Menu
From the Reports Menu, you can see a report of your BOM Redlines/Changes and the Document Packager: 
- BOM Redlines/Changes: Shows redline changes and Proposed BOM
- Document Packager Show documents for affected items and allows you to package all or selected documents together.
Affected Items Actions
Each Affected Item contains action hyperlinks (Action column):
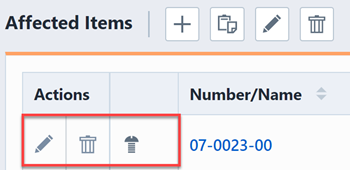
| Icon | Command |
|---|---|
 | Edit item properties |
 | Remove item |
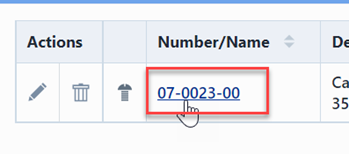
Opening Affected Items
To open any items from the affected item list, click the Number hyperlink.
Adding Affected Items
You can add items to the affected items list using various methods:
- Interactively - Using the Add button from the Toolbar
- Copy & Paste - from the Database Search window or Item Banner
- Automatically - When automatically generating Changes/ECO (i.e. BOM Import, Replace Item - [Where Used], Raise New [Changes/ECOs Page])
- Affected Item Rollup - When automatically or interactively running the Affected Item Rollup
- Import from a File - Import items from an Excel, Text, etc. file
Adding Items Interactively
You can add items interactively using the Add/Import button from the toolbar.
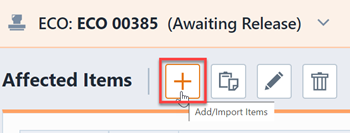
This will invoke the Affected Item Assignment Wizard.
The Affected Item Assignment Wizard contains the following key areas:
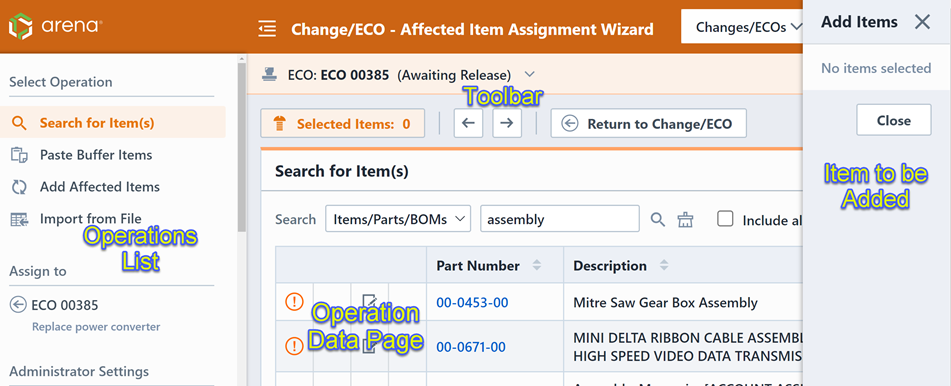
| Area | Description |
|---|---|
| Operations List | Select from available operations |
| Toolbar | Access to wizard page navigation functions |
| Operation Data Page | Adding/editing fucntions based on selected operation |
| Add Items List/Panel | Lists all items to be added to the affected items list |
Operations List
The Operations List contains the following options:
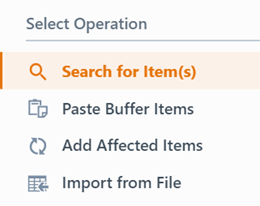
| Operation | Description |
|---|---|
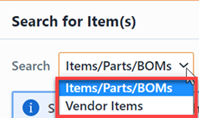
| Search for Item(s) | Allows you to search the database to find the desired items |
| Paste Buffer Items | Displays items in your copy buffer |
| Add Affected Items | Allows you to copy affected items from anotheor Change/ECO or Quality/CAPA Item |
| Import from File | Allows you to import affected items from files (text, CSV, Excel, etc.) |
Search for Items
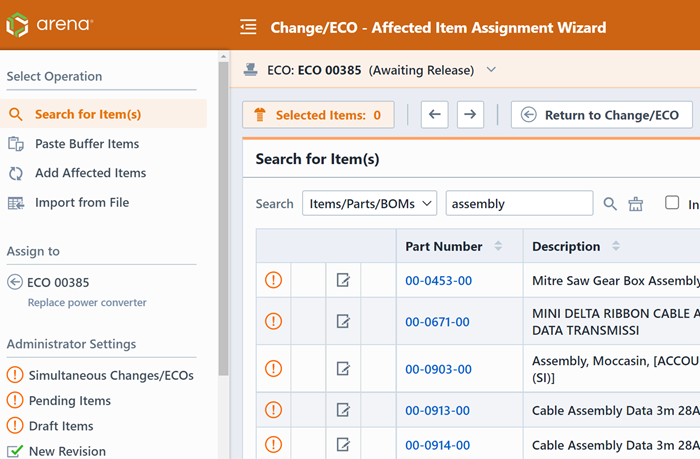
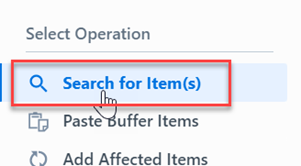
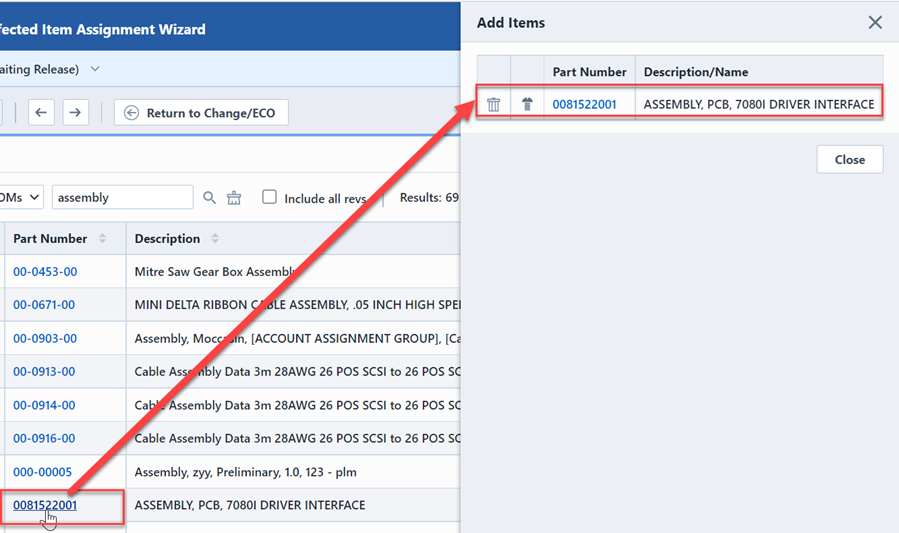
To search for the desired items to be added to the Change/ECO, select the Search for Item(s) operation.
The operation data page area will present a search list.
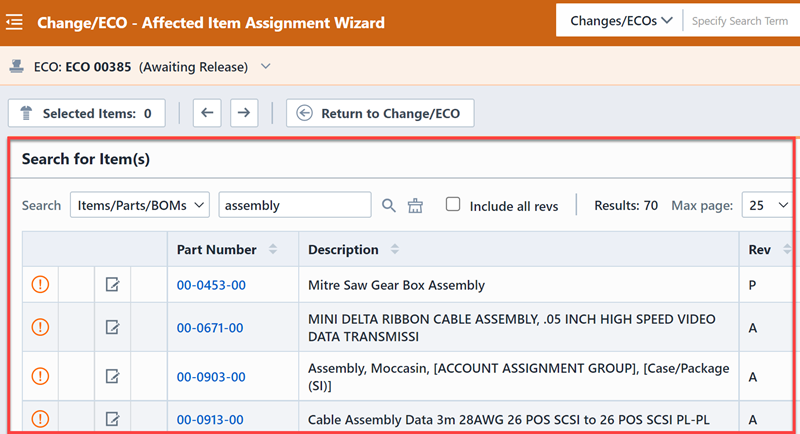
You can select the desired object from the object drop list.
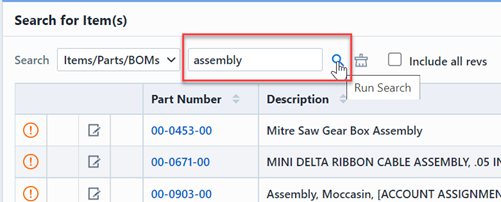
You can perform keyword searches to filter the list.
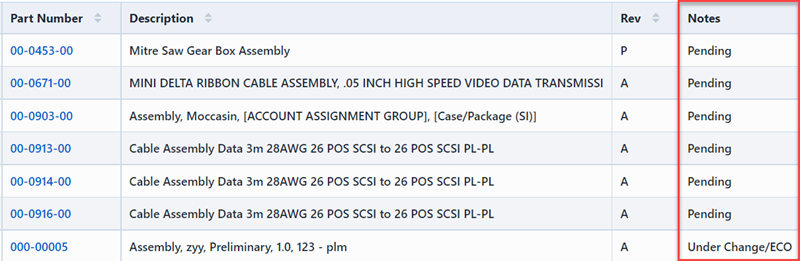
When adding items, Administrator rules may prevent certain items from being added to the Change/ECO. The Notes field will display any rule information.
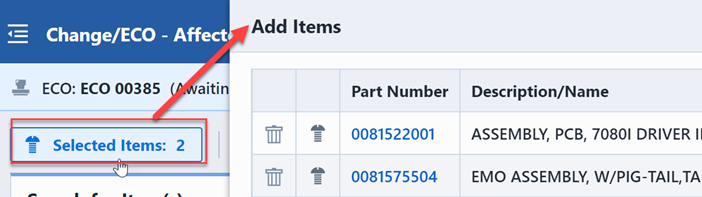
To add an item, click the part number hyperlink. The item will be added to the Add Items panel and the Toolbar will update to display the number of items to be added to the Change/ECO.
You can show/hide the Add Items panel by clicking the Affected Items toolbar button.
Paste Buffer Items
You can use copy and paste operations to add affected items from various forms such as the Database Search form.
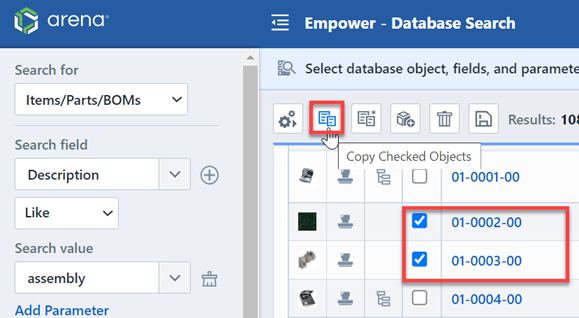
To paste items from your copy buffer, select the Paste Buffer Items operation.
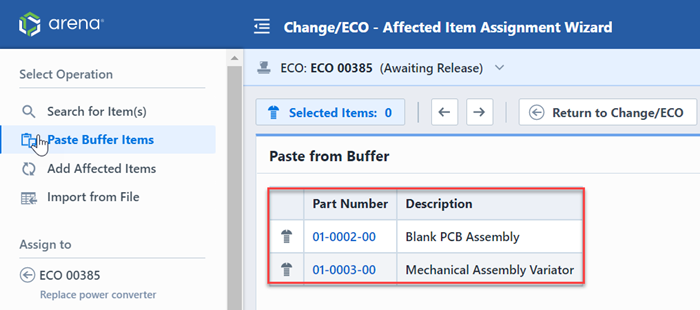
The system will display all buffer items.
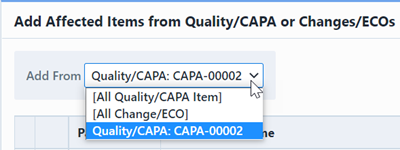
Add Affected Items
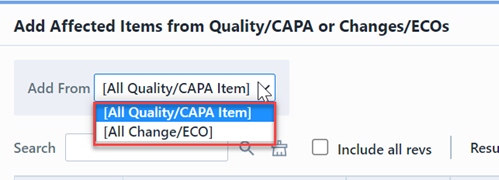
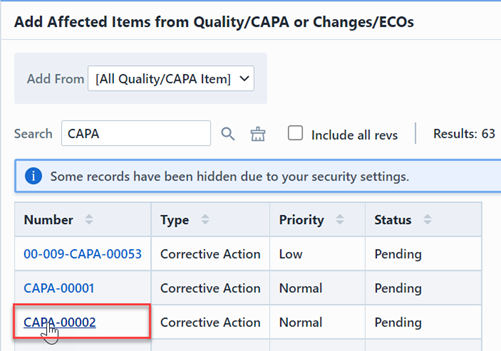
To add affected items from another Change/ECO or a Quality/CAPA item, select the Add Affected Items operation.
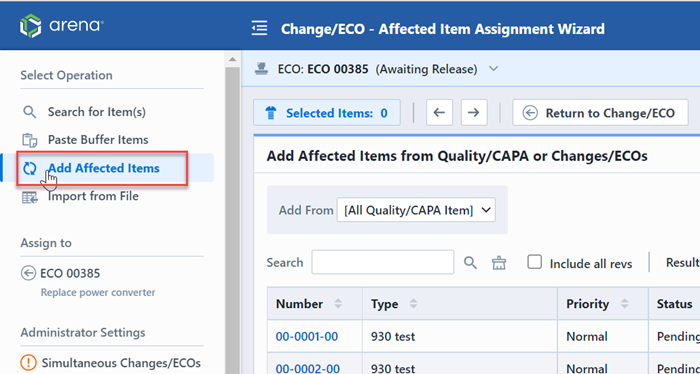
The system will allow you to select from existing Changes or Quality objects.
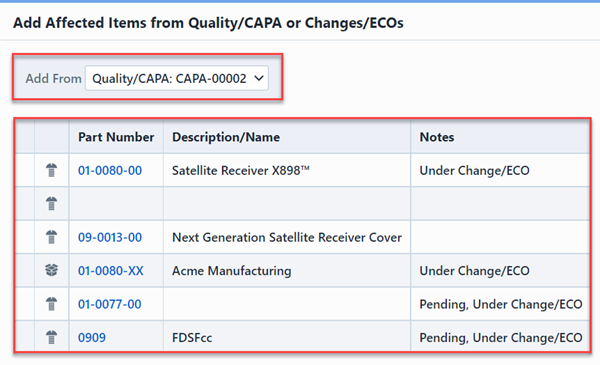
Selecting an existing Change or Quality item, will list the affected items from that object.
You can search for different Changes or Quality items by changing the Add From list.
Import from File
To import affected items from a file, select the Import from File operation.

You will then be able to browse and upload a file from various supported formats.
Affected Items Properties
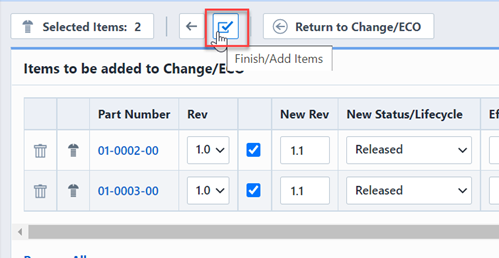
Once all desired affected items have been assigned to the Add Items list, click the Next button to assign the affected item properties before adding them to the Change/ECO.
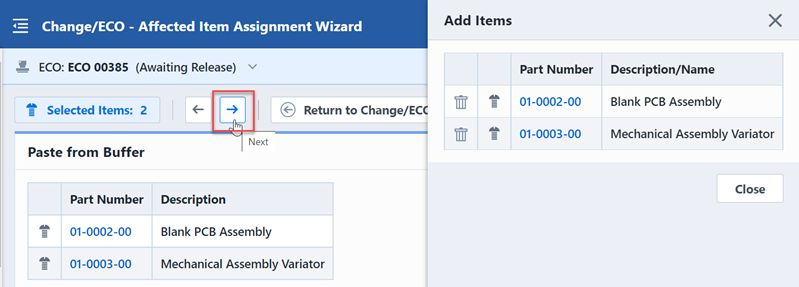
The Properties page will display all selected items and allow you to defined properties for each affected item.

Once all properties have been selected, click the Finish button to add the items to the Change/ECO.
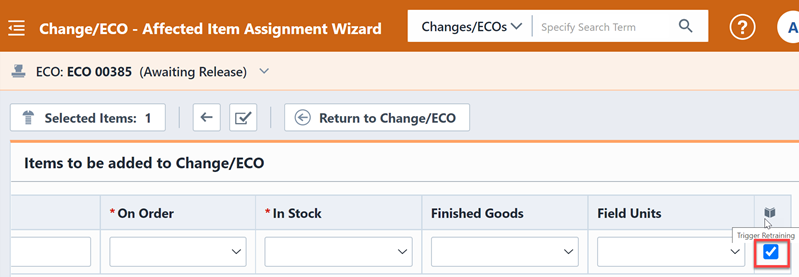
Empower Adminitrator can enable a new Retraining Column when adding an affected item on an ECO. When adding an Item to a Change, a new column titled Trigger Retraining, is checked by default. If selected and the Item is also on a Training object, the Item will trigger a new training assignment when a new revision of the Item is released through the Change. If the Trigger Retraining box is left unchecked and the Item is on a Training Item, no training assignment is triggered when a new revision of the Item is released through the Change. The Training column is symbolized by an icon of a person with a graduation cap.
Within the Change/ECO Options section, User Permissions page of Empower Administrator, a new checkbox titled Can exempt objects from triggering retraining is introduced.
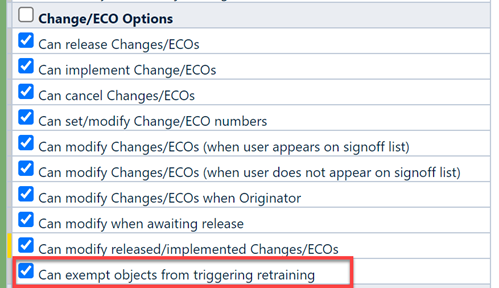
With the Can exempt objects from triggering retraining setting checked and settings saved, users will now encounter a Trigger Retraining column when adding Items to Changes.
This column is checked by default which means that if this Item is associated with a Training object it could trigger a retraining event when the new revision of the Item is released.
Editing Affected Items
To edit the properties of an affected item, click the Edit icon in the Actions column. This will display the Edit Item panel.
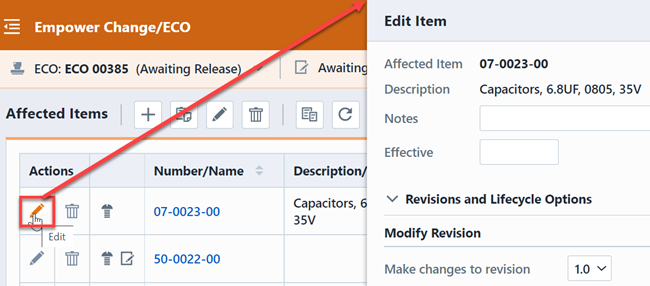
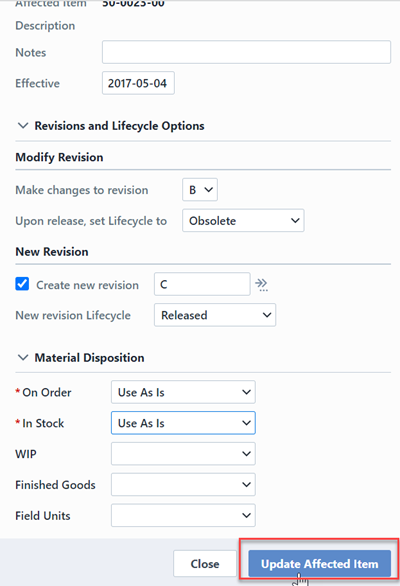
The Revisions and Status Options section allows you to define the revision and status settings for the affected item.
Revision and Status Options
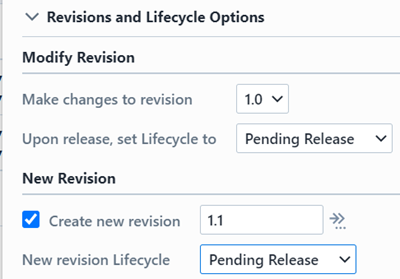
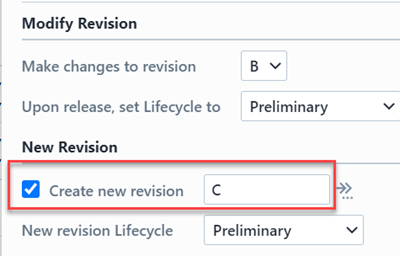
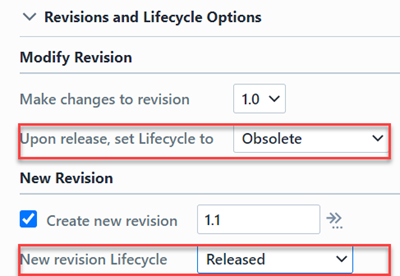
The Modify Revision section allows you to select which revision you wish to modify. If the item has previous versions, all versions will be listed in the Make changes to rev drop list.

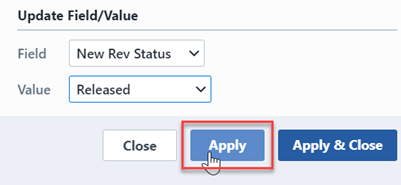
You can update the Status field for the modified revision by selecting the desired status from the Status drop list. When the Change/ECO is released, the system will update the modified revision to the status selected in this drop list.
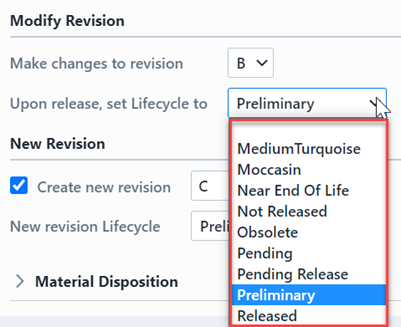
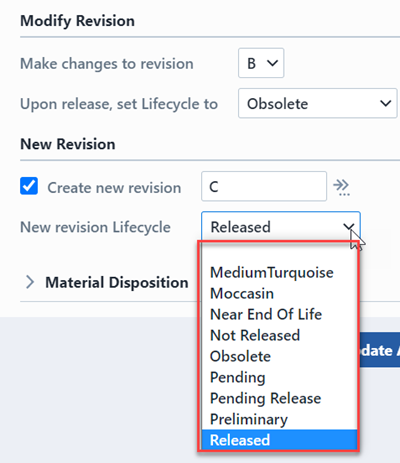
When processing a Change/ECO you can have the system create a new revision or modify and existing revision. To have the Change/ECO create a new revision, click the Create New Revision option and then specify the label for the new revision.
If you do not wish to create a new revision, uncheck the Create New Revision option. If this option is not checked, the Change/ECO will simply apply the changes to the selected revision.
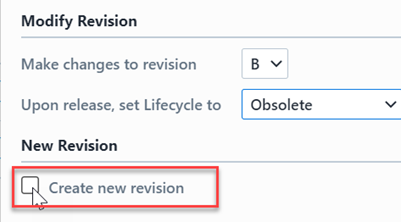
If you are creating a new revision, you can change the status for the new revision by selecting the desired value from the New drop list.
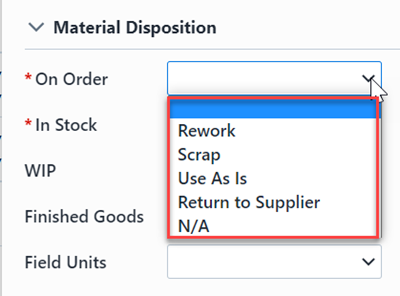
Material Disposition
Material Disposition fields and values are defined in the Administrator. You can select or specify the desired field value for each field.
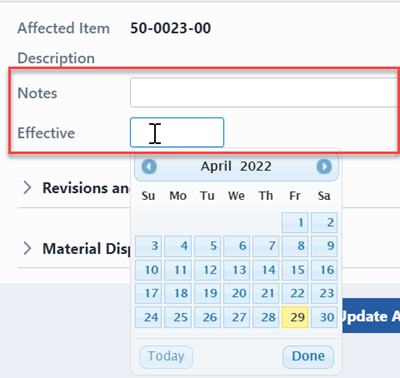
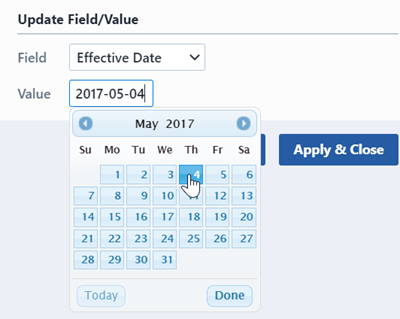
Effective Dates and Notes
For each affected item, you will be able to define separate notes and effective dates.
To update the affected item, click the Update Affected Item button.
Using Group Edit
The Affected Items page provides you with a Group Edit function that allows you to set Status, Notes, Effective Dates, and Disposition fields for all (or specified affected items). To open the Group Edit panel, click the Edit toolbar button.
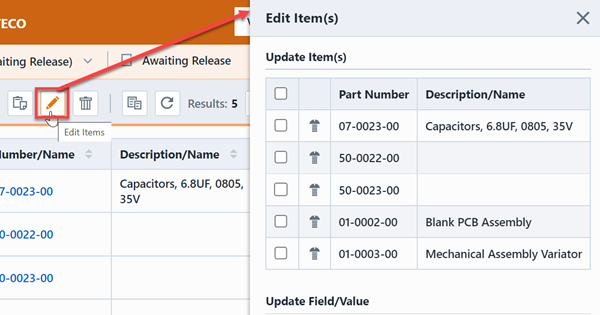
From the Edit Items panel you will be able to select which items to update.
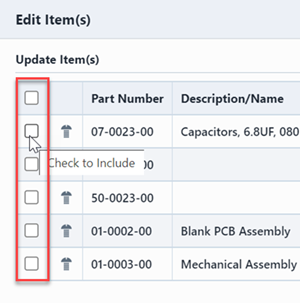
To set/modify a field, first, select the field from the Field drop list.
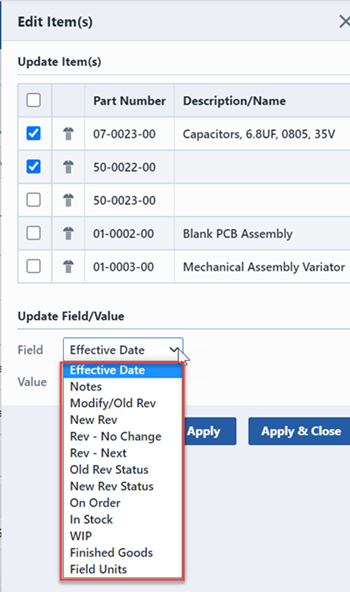
Once the field is selected, you can then specify the new field value in the Value list.
To modify the field for the specified (checked) items click either the Apply or Apply and Close button.
Removing Affected Items
To remove an affected item, click the Remove icon in the Actions column. You will be asked to verify the removal.
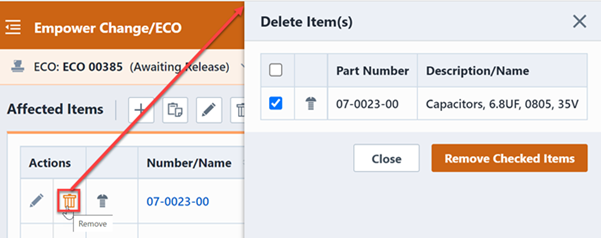
To remove multiple affected items, click the Remove All toolbar button.
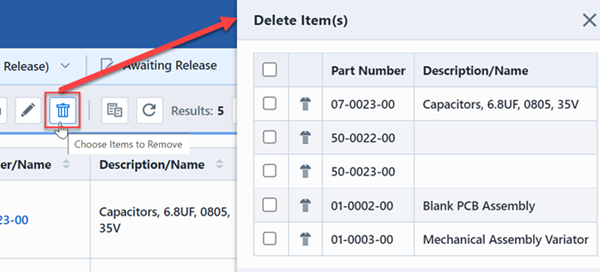
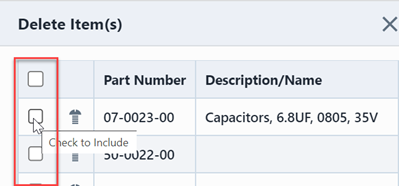
From the Delete Items panel, you will be able to select the items you wish to delete.
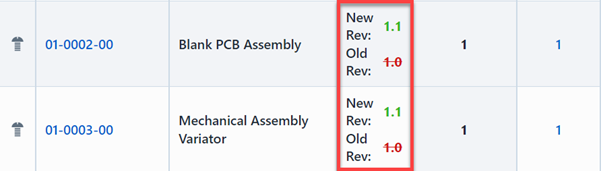
Revision Changes
For each item on the affected item list, you must specify the revision of the item that you wish to change by selecting it in the Modify Revision section.
You can define whether or not a new revision will be created by the Change/ECO by checking/un-checking the Create new revision: option in the Properties dialog box (Revisions and Status Options section).
The Affected items list will display a "strike-through" where Rev changes will occur.
Status Changes
For each affected item, you can define status changes for the modified and/or new revision. Status changes for modified and new revisions are defined in the Affected Item Properties dialog box.
Revision status changes will be displayed in the Status field of the Affected Items list.

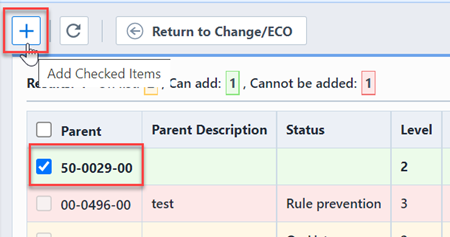
Affected Item Rollup
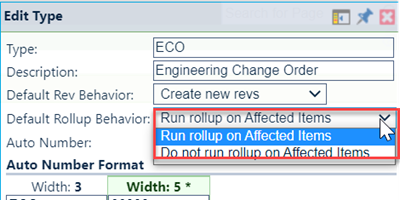
The Affected Item Rollup is a function that looks at all BOMs (and their Parent BOMs) that an affected item appears on and includes them on the affected item list. The Affected Item Rollup can occur automatically (assigned in the Administrator) based on the Change Type.
You can execute the Affected Item Rollup for any affected item interactively, by selecting the Affected Item Rollup option from the Check Items menu.
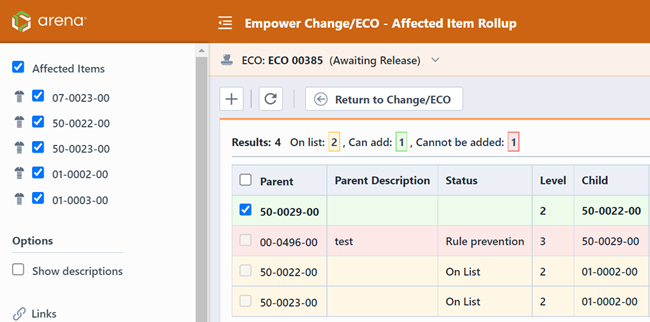
The Affected Item Rollup form will display all parent BOMs. The List Status field will indicate those items that are already on the affected items list as well as those that cannot be added.
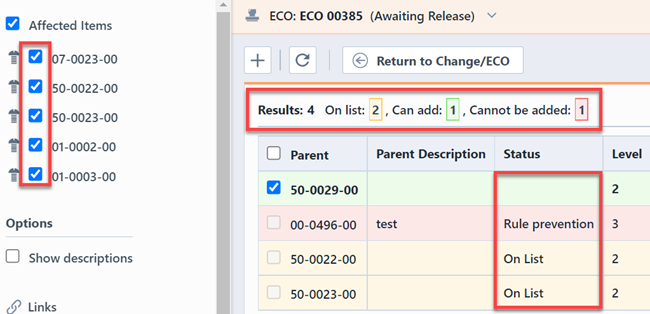
You can add items from the affected items list by checking the checkbox and then clicking the Add Checked Items button.
The Affected Item Rollup allows you to define rules that will be applied to rollup items to have specific items be ignored when the Automatic Rollup runs. These rules are defined in the Empower Administrator.
These rules are automatically applied when the Affected Item rollup is executed automatically or interactively.